![]() Estimating Edge’s team of experienced construction professionals and software engineers have developed the industry’s smartest takeoff and estimating software solutions for competitive estimates.
Estimating Edge’s team of experienced construction professionals and software engineers have developed the industry’s smartest takeoff and estimating software solutions for competitive estimates.
Don’t just estimate faster. Estimate better.®
- /
- /
- /
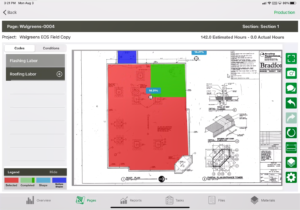
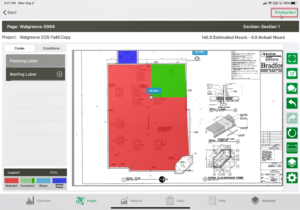
Tracking Quantities
Purpose: How to track quantity completion.
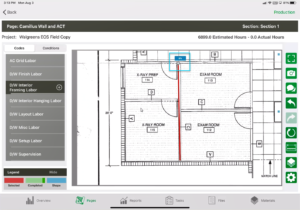
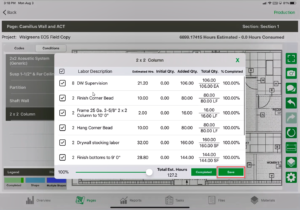
- Tap on the “Camillus Wall and ACT” page for this example.
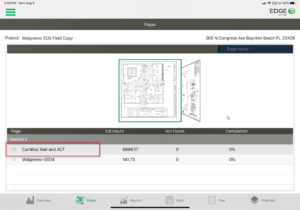
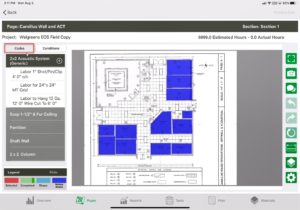
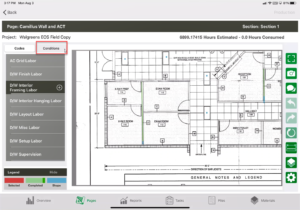
- If you tap on the conditions button, the user will see all the conditions inside this page.
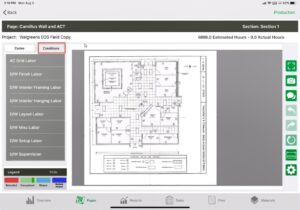
- Tap on one of these conditions to see the shapes that are associated with that condition.
- Tap the plus sign next to a condition, the user will see all the labor items produced by this condition.
Note: This is coming right from The EDGE. It starts with the user adding conditions to a page within the original estimate, and then drawing takeoff shapes associated with that condition. Labor items are produced based on setup of condition properties.
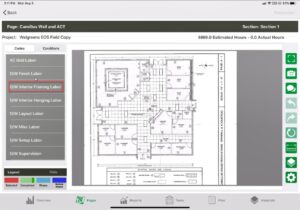
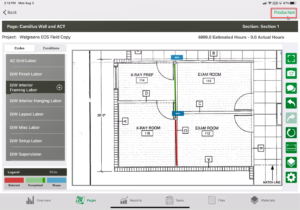
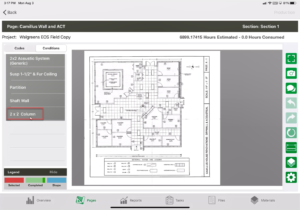
- Tap on the code button. You will see a list of all codes inside this project page.
Note: The code is showing the user all of the different shapes associated with that code. It is up to the user on whether to take the shapes in Code view or Condition view. The plus sign will also show all the labor items inside this code, grouped as such inside the original estimate.
- For this example, let’s tap the D/W Interior Framing Labor code.
- Select the shape in which the user would like to mark production.
Note: There are three different ways to mark production on a shape.
-
-
- Option 1: Double tap a shape to produce the crosshairs and create your own visual representation of completion.
To do this: Take your thumb and index finger and press them to the screen pinching outwards in order to zoom in to the screen. Pinching them inwards will zoom out.

- Option 1: Double tap a shape to produce the crosshairs and create your own visual representation of completion.
-
-
-
-
-
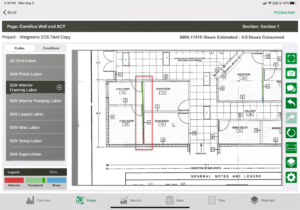
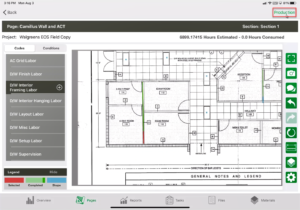
- Tap on the shape in question or take your index finger and drag to create a selection box that can select multiple shapes. Note: once the shape turns red the shape has been selected. On the bottom left of the screen there is a legend to reference to see what each color means.
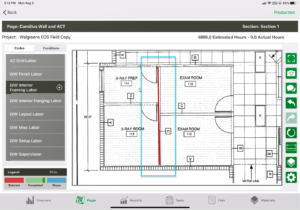
- Once the shape is red, and selected, tap the shape a second time to have the crosshairs appear.
- Take your finger and press on the crosshair begin to drag downwards. This will give you the ability to create a visual representation of the production.
- Tap on the shape in question or take your index finger and drag to create a selection box that can select multiple shapes. Note: once the shape turns red the shape has been selected. On the bottom left of the screen there is a legend to reference to see what each color means.
-
-
-

-
-
-
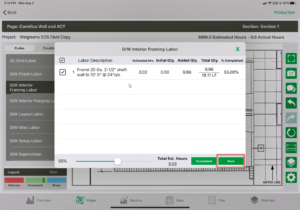
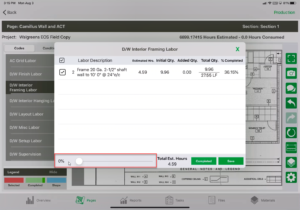
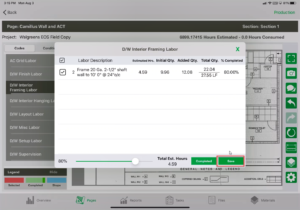
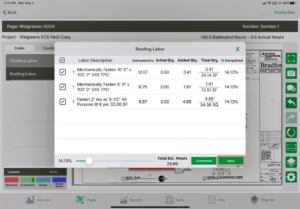
- Once at an accurate point, click on the Production button in the top right of the screen.
- A pop-up window will appear where you can review the data you are about to enter. You will see how many estimated hours The EDGE has calculated. The initial quantity tells you the initial amount of quantity for this wall. You will also see the added quantity from your drag of the crosshairs, then give you a fraction on added quantity to totally quantity, giving you the % completed.
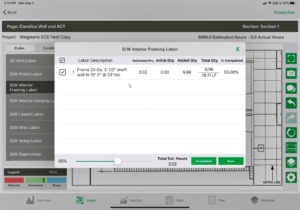
- If all looks fine, click the Save button.
- Once saving is finished, the shape will now appear with a green shading for the area you marked with the crosshairs. This indicates completion, and can be adjusted from its current shading.
- Once at an accurate point, click on the Production button in the top right of the screen.
-
-
-
- Option 2: Mark production by using the production slider.
-
-
-
- Tap and drag to select two walls.

- Tap the production button.
Note: There will be a two next to this labor item to indicate it is present in two occurrences. And the data will reflect how we now have two walls selected so it’s showing us the data for both of these lineal footages.

- A pop-up will appear, drag your finger along the slider to mark a completion percentage for these two walls.
- Click the Save button.
- Green shading will appear to represent the completion tracked.
- Tap and drag to select two walls.
-
-
-
- Option 3: Entering in exact quantities.
-
-
-
- Tap on the shape.
- Click on Production.
- Tap on the fraction.
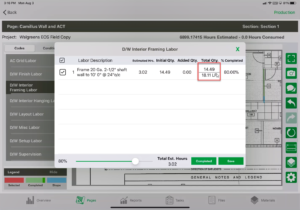
- A pop-up will appear allows you to type added quantity.
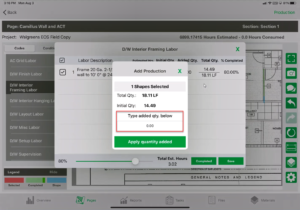
- Click Apply Quantity Added button.
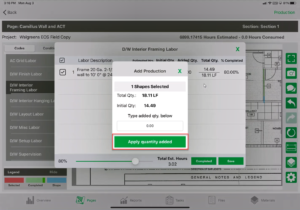
- Click Save.
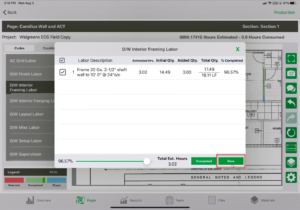
- Green completion shading will appear for the selected shapes.
- Tap on the shape.
-
-
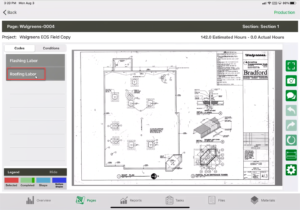
Let’s look at tracking things from a condition level. And we can focus on tracking count and area condition shapes. Lineal foot shapes were shown in the previous steps.
- Count:
-
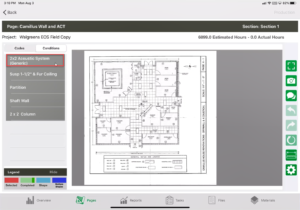
- Tap on the condition button.
- Tap on a desired count condition (2×2 column)
- Take your thumb and index finger and press them to the screen pinching out to zoom in to the screen.

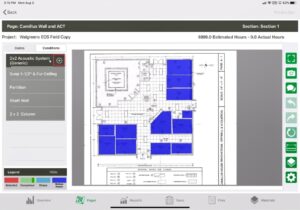
- Tap and drag your finger to use multi select, drawing a box to select shapes.
Note: marking count completions is that they automatically turn green instead of red when you select them. This is essentially an assumption that penetrations or count conditions will always be completed once they are started on a jobsite.

- Tap the production button.
Note: You will see a multitude of different labor items. These are all the labors that are required to complete a two by two column. Same as what we saw earlier.
Note: Everything is automatically jumped to 100%.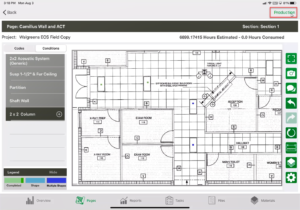
- Tap the Save button.
- Tap on the condition button.
- Area shapes:
-
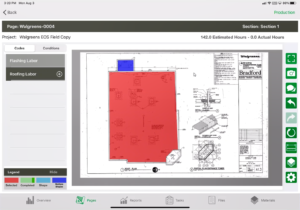
- Tap on the area code/condition.
- Tap a shape.
Note: The shape will turn red.
- Tap the shape again.
Note: Crosshairs will appear in the top left-hand corner.
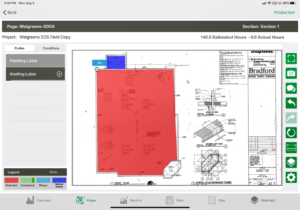
- Tap and drag the crosshairs to cover the area you’d like to mark as completed.
Note: you can control both corners of this completion shape and create a completion representation that fits real life. You can always take the completion box at its current state and use crosshairs to enlarge it or reduce it.
- Once at a desired state, tap on the production button.
Note: All of the labor inside of this code will appear, uncheck any labor items you wish not to add production to. This is essentially the same as using the plus sign to show all the labors in a condition or code, and then tracking by that item instead of the overall condition or code. It is representative of a more micro-level way of tracking. The app will store different completions for different labor items of a condition or code.
- Tap the Save button. Uncheck any one of these labor items.
- Once saving is done, green completion shading will appear. If you use plus sign to show labor items for roofing labor, you can click through each labor item and see the green shading for the completion we marked. For the labor you unchecked, you should see no green shading.
- Tap on the area code/condition.