![]() Estimating Edge’s team of experienced construction professionals and software engineers have developed the industry’s smartest takeoff and estimating software solutions for competitive estimates.
Estimating Edge’s team of experienced construction professionals and software engineers have developed the industry’s smartest takeoff and estimating software solutions for competitive estimates.
Don’t just estimate faster. Estimate better.®
- /
- /
- /
Template Tilde Codes
Template Tilde Codes & CQty’s
Overview:
Templates allow one item to be used in place of many similar items. The template screen is where you enter these different sizes, and other parameters. This screen is only accessible on items that are checked to use template parameters. The check box is found on the “from template” column in the properties dialog box of the item. To get to the template database, open the item database, click the template tab for the item desired. For more information, see setting up a template item, adding new template items and template tilde codes and mathematical operators.
Examples by Industry:


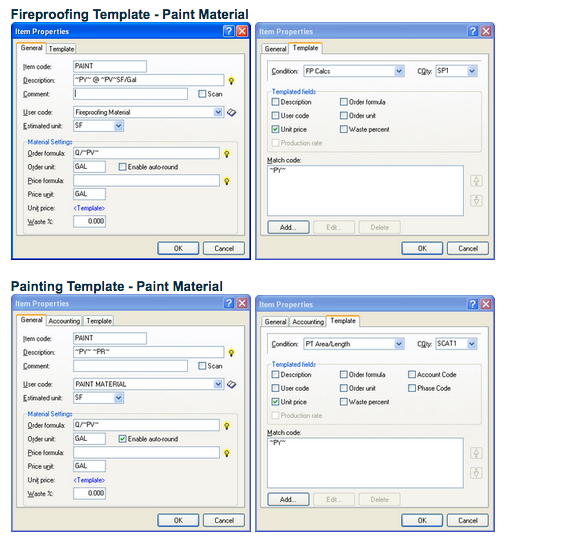
Template Tildes:
~??~ – The two squiggly line on either side of the question marks are called tildes. Ironically, they are used to designate a Tilde Code! You do not need to put braces around a tilde code – the Tilde Codes are automatically calculated. However, if you want to use a tilde code in a formula, you need braces, like this:
{SF*~IT~}
Where: SF = 100 square feet and IT = 1″
Without the braces, the program doesn’t know that the above is a formula, so you would get something like SF*3½” in your description. With the braces, you get the quantity SF times Insulation Thickness.
Item Templates:
To insert a new template item, you start by creating a new item by filling in the required fields. Then you will open the Template tab within the Item Properties dialog. You can easily create items for variations of the same items using the template feature. To create a template, click on the Insert icon (see below) which will open the Item Properties dialog.
The third tab of this dialog is for the Template information. You will need to link this templated item to a condition. To do so, open the drop down menu (using the down arrow) next to the Condition field. Then you will select a CQty so the program will know how to calculate the condition this item is linked to. You can also select the qualities about this item that will change from a Templated fields list. This will allow you to create a new item from an existing item, by changing only certain things (i.e. unit price, order unit, etc.). Finally, you will need to determine what Match code(s) will be assigned to this template. The Match code(s) could be either Tilde codes or CQtys/formulas. These match codes represent what factors cause the templated fields to change. For example, you may want to set up a stud template. All studs are similar, but the cost may change based on the stud gauge, length, and/or width. So, the match codes for a stud template might be ~SG~, ~SW~, ~SY~. These tilde codes represent stud gauge (~SG~), stud width (~SW~), and stud type (~SY~). To add match codes into your template, press the Add button, which will open a Match Code Builder dialog. You will choose to create a match code from a Tilde code or a CQty\formula by pressing the corresponding radio button.
Tilde Codes:
If you choose to create your match code using Tilde codes, you will select the appropriate CQty for the condition this item is being linked to. The list of possible CQty’s is opened using the drop down menu, with the down arrow next to the CQty field. Then you will select a Tilde code that will tell the program where in the condition to look for the values that will calculate the cost of this condition based on the inclusion of this templated item. Then you will insert the Value Range for the template to follow. For example, your stud price may change based on length. If you inserted values of four feet and eight feet, your studs might cost $1 if they are under 4′, $1.50 if they are 4′-8′, and $2 if they are over 8′. You could also Add a catch-all value, which would allow you change the information for all items over a certain measurement.
CQty/formula:
You can also create your match codes by building a CQty/formula using the same dialog. To do so, click on the Builder icon. This will open a dialog that will allow you to create a custom match code. The condition is already filled in, as it is taken from the Item Properties dialog. But then, you will need to string together CQty’s and/or Tilde codes. You will see a list of categories of CQty’s/Tildes. (Press the + button to the left of each category to see its contents.) Click on each CQty/Tilde that you need, and press the Insert button after each one to insert it into the String field. Should you make a mistake and remove a code you really needed, you can press the Replace button to reinsert it into the string. If you need to create a formula out of these CQty/Tildes, insert the appropriate mathematical symbols after each CQty/Tilde. When you have completed your string, press the OK button, and your new CQty will be fed into the CQty field of the Match code builder. From here, you can add in your Value Range as discussed above.
Any incorrect match codes can be changed using the Edit button. Any match codes that are incorrect or become obsolete can be removed by selecting that match code and pressing the Delete button. The order that you list the match codes in will determine how your templates are organized in the item database. For example, let’s say the match codes for a stud template are set in this order: stud gauge, stud width, and stud type. When you look at the templated stud items, they will be sorted first by gauge, then by width, and then by type. This is a fairly standard example. But if you would like to see them sorted by type first (because that’s how your vendor presents them to you in a sales list), you would set the order to be type, gauge, width (or type, width, gauge).