![]() Estimating Edge’s team of experienced construction professionals and software engineers have developed the industry’s smartest takeoff and estimating software solutions for competitive estimates.
Estimating Edge’s team of experienced construction professionals and software engineers have developed the industry’s smartest takeoff and estimating software solutions for competitive estimates.
Don’t just estimate faster. Estimate better.®
- /
- /
- /
Tapered Insulation Tutorial Drawings
Tapered Insulation Tutorial Drawings
(Please Print Appendix A and Appendix B prior to beginning lesson)
Appendix A:
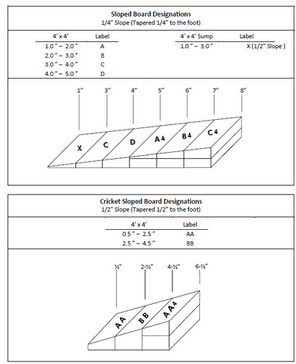
Appendix B:
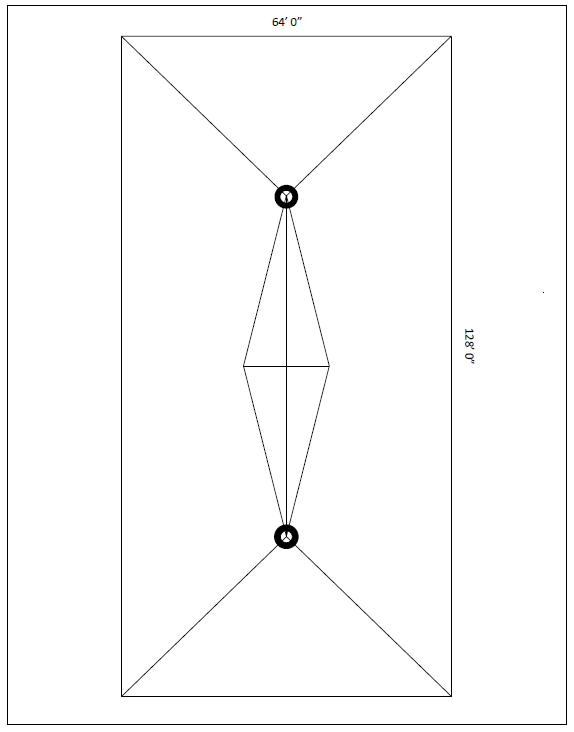
NOTE: Drawing is NOT to scale, use Calculate Scale to set the scale
The Tapered Insulation Tutorial
Setup:
1.Start The EDGE Estimating system. Start a new job (you can name it whatever you like).
2.Create a page. Tape the Appendix A drawing to your digitizer board. Use one of the noted dimensions and Calculate the scale.
3.Go to the Condition List screen and Insert the Tapered Insulation Condition.
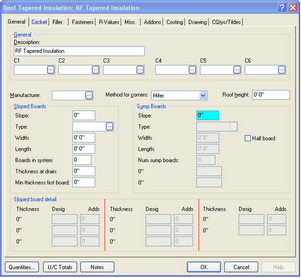
4.Using the Tapered Board Designations found on Appendix B fill out the Condition Properties accordingly. Since it is typical for the field to cut the insulation board corners leave the method for corners set to Miter. The EDGE will automatically configure the thickness of the sloped boards from
– The Slope of the Sloped Board
– The Width of the Sloped Board
The number of boards in the system and the Minimum Thickness of the sloped boards
5.The Sloped Board Designators are A – B – C -D. The X board is the sump board.
6.Using the Tapered Board Designators found on Appendix B fill out the information for the sump. The EDGE will automatically configure the thickness of the sump from:
– The thickness at the drain
– The slope at the sump
– The Width of the sump
– The number of sump boards