![]() Estimating Edge’s team of experienced construction professionals and software engineers have developed the industry’s smartest takeoff and estimating software solutions for competitive estimates.
Estimating Edge’s team of experienced construction professionals and software engineers have developed the industry’s smartest takeoff and estimating software solutions for competitive estimates.
Don’t just estimate faster. Estimate better.®
- /
- /
- /
Segment
How to Digitize Using Segmented Length
Segment:
![]()
The second method for drawing length is called Segmented Length. This method is recommended when you have to pick up your digitize pen a lot. For instances when digitizing interiors walls. The thing that you have to remember when using Segmented Length is that every line is a segment and every segment has a beginning and ending point.
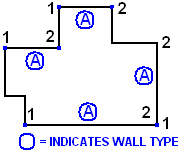
In the example above, we came up with a wall type “A” and placed it around the perimeter of our building and then digitized Wall Type A using Segmented Length. Notice how start (1) and stop (2) keep repeating themselves. Every wall is a wall segment. Look at the bottom right corner of the example. The ending (2) point for the horizontal segment is also the beginning (1) point for the vertical line. When digitizing walls you will continuously run into this situation.
Other examples of Segmented lines.
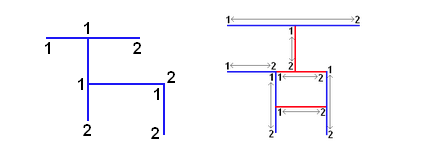
In the left panel there is only one wall type but each line has a beginning and ending point, notice the one point where the end of the middle horizontal line becomes the beginning point of the far right vertical line. This means that point has to be digitized twice.
In the right panel we have two different wall types a red and a blue. It does not matter the same principles hold true. The only difference being is the blue lines would being to one condition and the red a second condition. You would typically digitize one, say blue, press Enter move to the next condition (red) and digitize those lines.
Note:
The biggest mistake new users make is to try and show how fast they can digitize. It is practically guaranteed that you will miss a point and everything after the missed point is not going to be right and you will have to do it over.