![]() Estimating Edge’s team of experienced construction professionals and software engineers have developed the industry’s smartest takeoff and estimating software solutions for competitive estimates.
Estimating Edge’s team of experienced construction professionals and software engineers have developed the industry’s smartest takeoff and estimating software solutions for competitive estimates.
Don’t just estimate faster. Estimate better.®
- /
- /
- /
- /
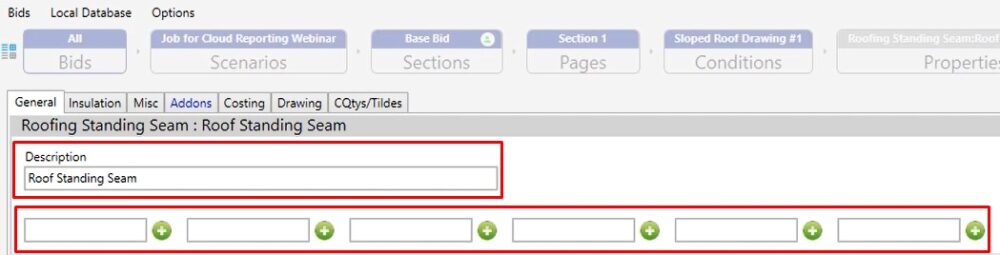
Roofing Standing Seam Module Condition Properties – All Tabs
This video covers the standings in module condition properties in v12.
Roofing Standing Seam Module Condition Properties
You’ll notice that this is going to look a little bit different than the traditional standing seam condition that you would be using because this is part of the specific standing seam module which allows you to print your cut list as well.
Description
Description can be changed to whatever you want it to be for this condition.
C Fields
Six C fields are user definable fields in which we can make modifications or use them in formulas if need be.
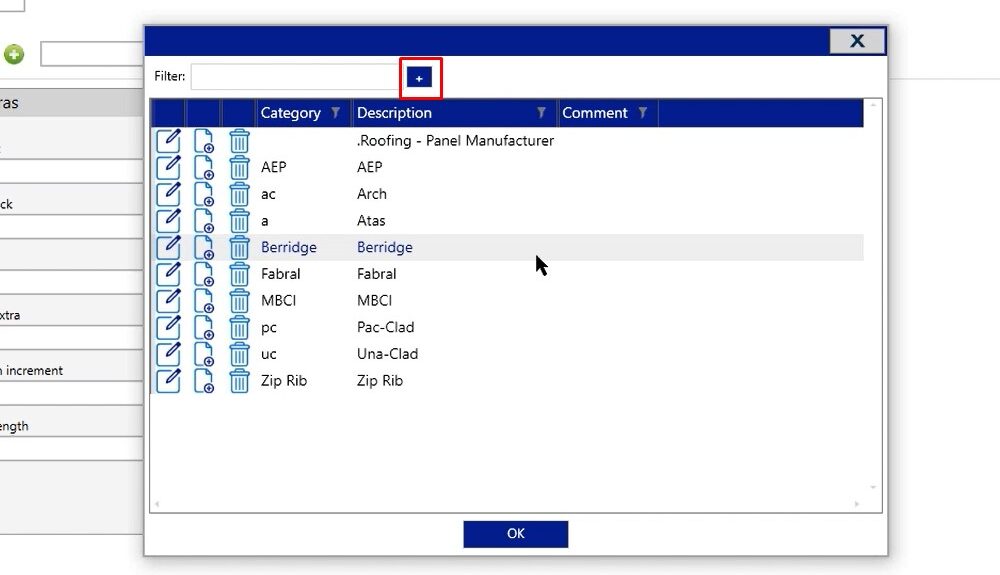
Manufacturer
Click the three dotted button and choose any option available. If you don’t see an option out there that you need, click the blue plus sign and create one for yourself.
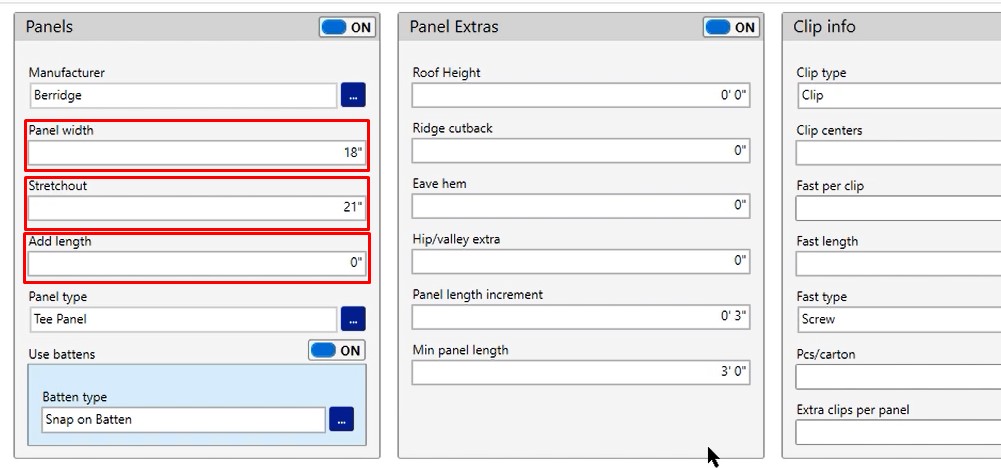
Panel Width
Panel width will be the flat portion of the panel that’s actually going to be laying against the deck of the roof.
Stretch Out
Stretch out will be the total stretch out of material that you’re going to need when creating this panel.
Add Length
This additional length field is used to add whatever inch increment that you type in there, to the total length of PIM. For example, if you measured your panel and it was 21 feet and you had three inches in there as added length, it’s going to produce a 20′ 3″ panel.
Tee Panel
Tee Panel is the style of panel you’re working with. You can click your three dotted button and choose different options if you need it to.

Battens
Most of the time this is turned off, but if you do end up needing battens for your standing seam system, feel free to turn that on and populate the information.

Roof Height
This is an information only field.
Ridge Cutback
Used to add additional inch increments so that when you get your panel out to the field and you have to make some cuts for them around the ridge, you have a little bit of extra material.
Eave Hem
The eave hem is the same thing as the ridge cutback and is being calculated at the eave rather than at the ridge
Hip/Valley Extra
Hip/valley extra is the same as your ridge cutback and eave hem, however it’s additional material. This way, when you’re making your cuts in the field, you’re not going to be short on material.
Panel Length Increment
For this example, if you were to measure a 21′ 1″ panel, it will round up to a 21′ 3″ panel. This way, it makes it easier for your cut list and it’s going to combine light panels together. It’s also going to reduce the number of panel classifications that you’re going to have in that cut list, so it’s going to condense that list down to make it easier to manage for you.
Minimum Panel Length
Minimum panel length means that you don’t want a panel to be under a specific length. In most cases, you’ll see the panel length is 3′ and that’s usually what we have in there as our default. Anything that’s measured under a 3′ panel will be rolled out into a 3′ panel for you and will be calculated that way. This is a tool that we use to help reduce the number of panel options you’re going to have presented on that cut list.

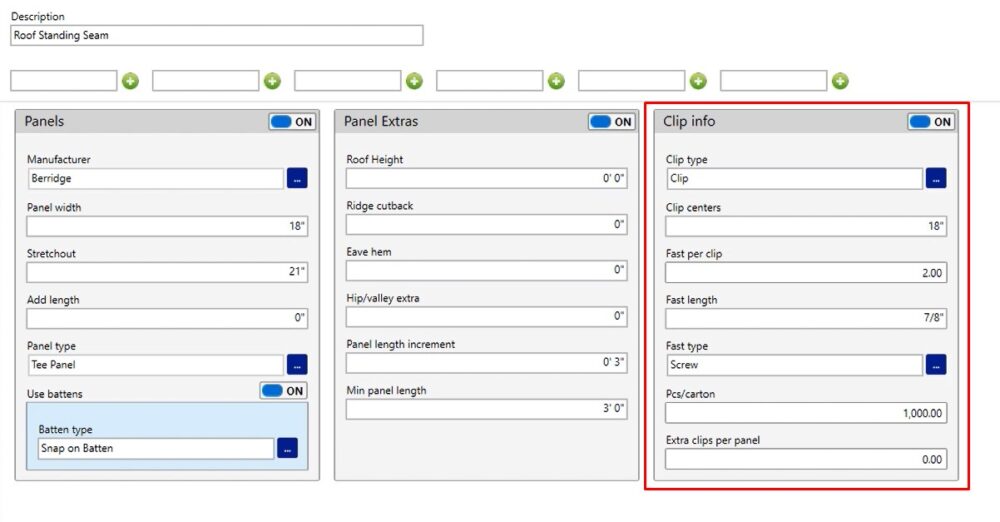
Clip Type
You can choose to change this out by clicking on the three dotted button or you can leave it generic as is.
Clip Centers
It’s asking you how often are you going to be putting those clips based on inch increments. So in this case, we’re saying every 18 inches along the panel, we’re calculating a clip.
Fast Per Clip
It’s asking us how many fasteners per clip we’re calculating. So in this example we’re saying 2 fasteners per clip.
Fast Length
The length of that fastener.
Fast Type
The Type of fastener.
Pcs/Carton
If you leave your pieces per carton at zero, we’ll give you a per piece pricing option on the pricing screen. If you leave it in, the box count will give you a per box count on the pricing screen.
Extra Clips Per Panel
If you wanted to make sure that you weren’t going to run short, you could add more clips for every panel. All this field is doing is giving you additional clips per the number of panels you have.
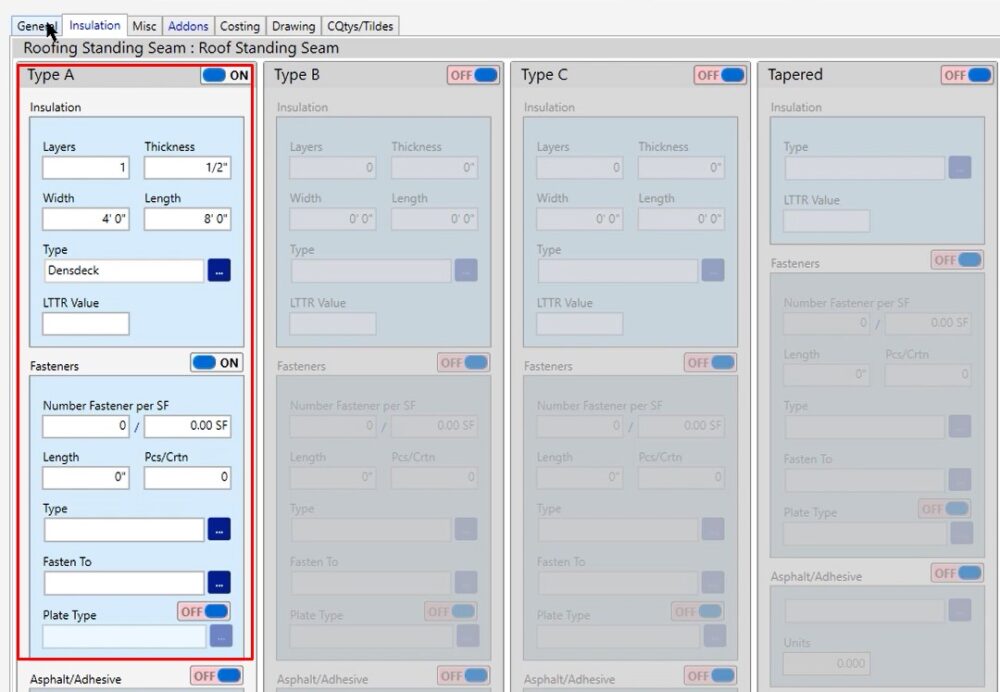
Installation Tab
Where you can calculate any substrate board or any insulation that you may need on your project. You can turn on any field that you need.
If you do have any additional questions or you run into any issues while setting this up on your own, please feel free to give us a call on the tech line and we’d be happy to assist you in any way we can.