![]() Estimating Edge’s team of experienced construction professionals and software engineers have developed the industry’s smartest takeoff and estimating software solutions for competitive estimates.
Estimating Edge’s team of experienced construction professionals and software engineers have developed the industry’s smartest takeoff and estimating software solutions for competitive estimates.
Don’t just estimate faster. Estimate better.®
- /
- /
- /
- /
Roofing BUR Area Condition Properties – General Tab
This video covers the Roofing BUR Area Condition Properties for the General Tab in v12.
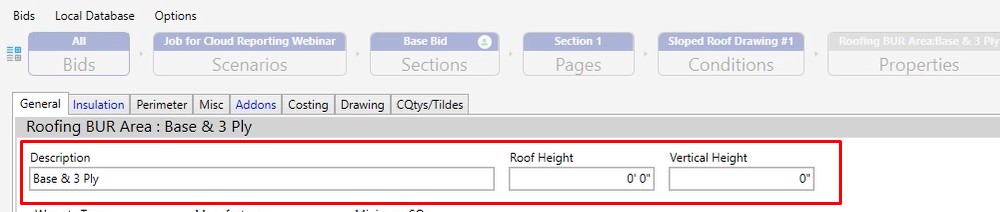
Condition Description
You can type in whatever you want your condition to be described as.
Roof Height
This is an informational field only.
Vertical Height
The vertical height isn’t going to calculate information, but it’s going to be based on the perimeter that you draw.
For example, if you measure a 100 x 100 building, in this case, you would have 400 lineal foot of perimeter. If you were to put 12 inches in there, we would calculate 400 square feet of additional material – it would be one square foot times 401.
The vertical field was just around the edge of the building, almost like a built in waste factor if you wanted to calculate it that way.
Wrranty Term, Manufacturer & Minimum SQs
Next are your C fields. These are going to be user definable fields that you can use to manipulate specific information.
In this case, this is how we’re building out your warranty line for your roofing conditions.

Plies Section
In the plies aspect you’ll notice that we have (1) base ply, (3) inter-plies and if we want, we can turn on cap fly as well.
As you’re going through and filling out the plies information, it is important to make sure that your plies has the number of layers that you want to have available for you on this project.
Description
This is going to be where this product is actually going to be used on the project.
Type
This is a specific product that you’re going to be working with.
Labor
When looking at the base ply, you’ll notice that we have a fasten labor and a mopping labor.
Units/Ply/SQ
If you wanted to see where the adhesive was coming from, that information is directly to the right. This number is essentially saying that per layer, per square, you’re going to be putting down 30 pounds of asphalt.
If we were working with adhesive, we would be putting down the number 1 and that would ultimately be changed when we run the wizard.
If you don’t need any additional labor, like for this cap sheet, you would leave those fields off.
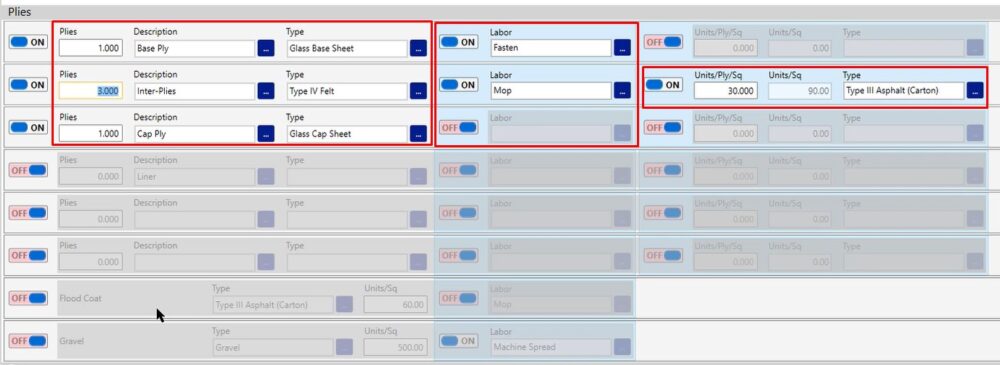
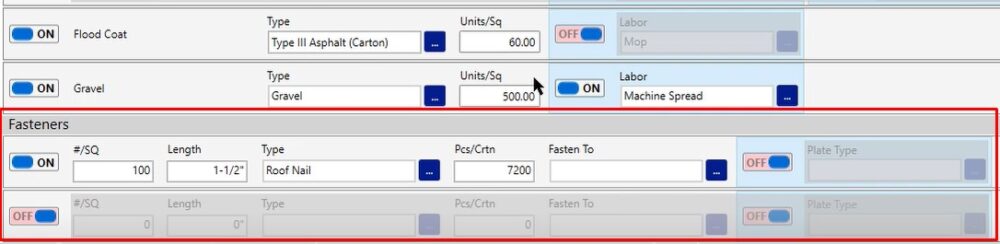
Flood Coat
We do have a flood coat and a gravel option, so you can turn either one of those on if you need them and you can start to populate the information.
- Type is going to be the type of asphalt you’re using.
- Units per square is how many pounds per square of flood coat you’re going to be putting down.
- If you wanted an additional labor, turn that additional labor on and fill it out with what need it to be.
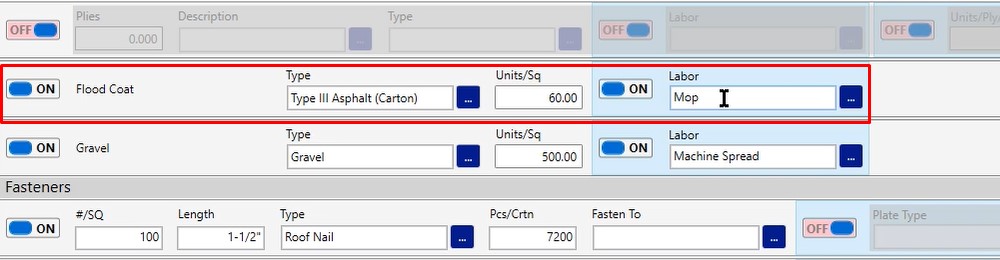
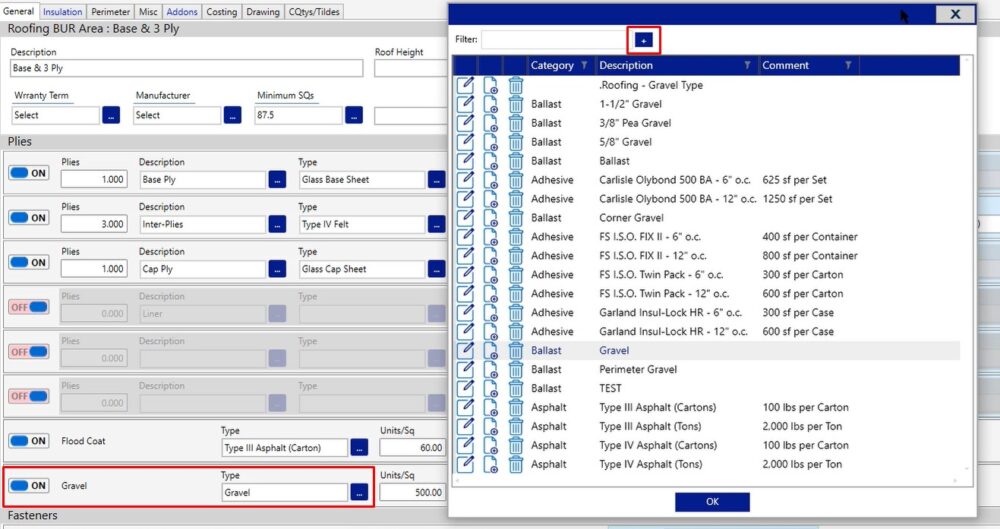
Gravel
You can also turn on gravel if you need it.
The type is going to be what specific type of gravel you need. Click the 3 button icon and choose from the list.
If what you need is not there, click the plus and you can add that option in.
Fasteners
- These fasteners are currently being calculated at 100 fasteners per square and they are 1 1/2″ roof nails, that come in 7200 a box.
- As you’re filling this out, we do ask for the total number of fasteners per square that you’re going to be using to secure that base sheet.
- We will ask for the length of the fastener, as well as the type of fastener you’re using.
- If you leave the piece per carton at zero, you’re going to get a per piece count out on the pricing screen. And if you fill that out, you’re actually going to get the box count on the pricing screen.
- The fasten to field is information only.
- If you did need plates you can turn that option on and calculate that information. In this case, we don’t need the plates because these roof nails already come with the caps.
- You have a second fastener so if you weren’t going to be mopping any of these other plies down or even fastening another plie down, you do have the capability to turn that on and add the additional fasteners that you may need.
If you have any additional questions, please feel free to reach out to our tech team. they’d be happy to assist you in any way they can.