![]() Estimating Edge’s team of experienced construction professionals and software engineers have developed the industry’s smartest takeoff and estimating software solutions for competitive estimates.
Estimating Edge’s team of experienced construction professionals and software engineers have developed the industry’s smartest takeoff and estimating software solutions for competitive estimates.
Don’t just estimate faster. Estimate better.®
- /
- /
- /
New Template
How To Create A New Template Item
Setting Up The Estimate for Paper Plans:
·To create a new job, click File | New or you may click the New icon on the toolbar.
·This opens the Job Properties dialog screens, there are a total of six tabs where you can enter as much information about an estimate as you wish to. Only one field the Bid Name field is a required field to be filled in for obvious reason. The remainder are optional and are not required in order to estimate.
NOTE: For a complete explanation of the Job Properties dialog and all of the different tabs click on Job Properties Dialog.
·After entering your information about the New estimate click the OK button.

NOTE: By default, all EDGE job files will be saved to the Job Database you created when The EDGE was installed on your computer, this could be your local hard drive or a company network server. Remember with the advent of version 10.7.6 all EDGE jobs are now stored in a SQL (Sequel) database format.
Once you clicked the Save button, the Job Properties dialog closed and the Page List Screen automatically opened. As this is a new job there is no data to display at this time. The Page List screen is the equivalent of a page from your drawings. Without going into detail about a specific trade, we will attempt to do this in generic terms. The next step is to add a page.
NOTE: The EDGE always uses Insert from the Edit menu or the Insert icon to add or insert something into the current or open screen.
Click the Insert icon. This time the Properties dialog for the Pages screen opens.
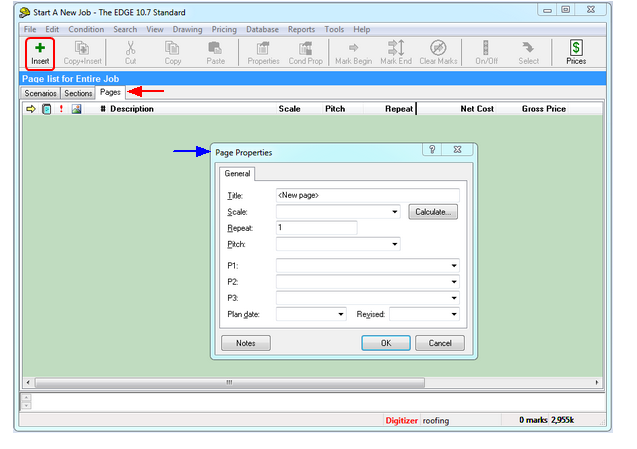
The Pages screen is nothing more than a list created by the estimator of named portions of the estimate at hand. For large projects the pages in your estimate will follow the pages from the set of plans you are estimating from. On say a five story building a roofing contractor will have only one page, while Fireproofing, Interior, Acoustical and Painting contractors will have several pages. Regardless of your trade the Page Properties dialog is the same for all.
Title – A name you give the page, make one up or use the same name as is on the title block of the plans.
Scale – The scale of the drawing or detail being estimated. Enter a scale or select a scale from the drop down icon or, you can use the
button to have the EDGE calculate the scale of the plan being estimated.
Repeat – Repeats everything quantified for the page by the number entered in the repeat field. Going back to our five story building again, if floors two through four are identical (identical being the operative word here) then the estimator could enter a three in the Repeat field take off the second floor and be done with his estimate. Remember everything (labor, materials, subcontract, equipment, etc) is extended by the number in the Repeat field, the default setting is always one (1).
Pitch – Roofing contractors will the pitched of sloped roofs here. Interior contractors can use this field to enter the slope of vaulted ceilings. It is applicable to almost all trades in one manner or another. You can enter the slope or select a slope from the drop down icon
P1, P2, P3 – A place where the estimator can write something, which can later be used to sort on for reporting.
Plan Date – the date stamped on the plans.
Revised – Revision date stamped on the plans.
Notes – Access a word processor where the estimator can create notes specific to this estimate.
OK – Saves all of the entries and changes the estimator made to this dialog and then closes the dialog.
Cancel – Cancels all of the entries and changes the estimator made to this dialog and then closes the dialog.
While none of the fields of the Page Properties dialog are required in order to create a page once you reach the drawing screen you will not be able to draw until you have created a scale for the estimate.
After creating a page title and entering a scale click OK

You may or may not have noticed that after you clicked OK in the page properties dialog and returned to the Pages Screen another Tab was added to the growing list (Scenarios, Sections, Pages) and now Conditions. Whereas a page is usually a single entry per page (eg one page for First Floor, one page for Penthouse, etc.) a Condition list for a single page many have only a few conditions or it could have hundreds. It varies depending on the different thing that have to be taken off on any given page.
What are Conditions? Conditions are everything that you have to take off for the current estimate, here are some examples of conditions by trade:
Acoustical – Ceilings, Moldings, Specialty Work
Drywall – Partitions, Soffits, Shaft Walls
E I F S – Walls, Quoins, Plant On’s
Fireproofing – Beams, Columns, Bar Joists
Painting – Shapes, Walls, Floors, Vinyl
Roofing – Wall Flashing, VTR’s, Walkpads.
Conditions are special dialogs created by the EDGE on a trade by trade basis for specific “conditions” the estimator will encounter when performing an estimate. Once again here are some examples of conditions by trade
Acoustical – Acoustical Area, Length and Count (only used by Acoustical Contractors).
Drywall – Partition Condition, Soffit Condition, Shaft Wall Condition.
E I F S – EIFS Area, EIFS Length and Count (only used by EIFS’s Contractors).
Fireproofing – Fireproofing Calculations and Fireproofing Surfaces Conditions.
Painting – Paint Area, Length, Finish and Surfaces Conditions.
Roofing – BUR, Single Ply, Concrete Decks, Standing Seam, Tapered Insulation.
Think of a Condition as a place where you enter and store specifications for a roof system i.e a 4GIS, or for a fire rated ceiling, or the W/D of a piece of steel etc. Conditions are stored in the Group Database and the items needed to build that roof or wall are attached to the condition via the Group Item Database.
The database loaded onto your machine at the time it was installed in your offices has all of the Conditions that normally come with a purchases. There are a couple of optional conditions which are available for purchase this mostly pertains to the roofing industry, see your sales representative for additional information.
·Using your mouse click the Conditions tab, the Conditions screen should open on your computer. As this is a new job the screen will be blank. Your next step is to get the Conditions you need to estimate from the Group Database into the Condition List screen and get them quantified.
·Click the Insert icon. This time the Insert Group dialog for the Condition screen opens.

Depending on your trade and the options you purchased you will see only one of the two Insert Group dialogs seen above. Both do exactly the same thing, the only difference is the one on the right has access to a second database called the Surfaces database. If you do not see the Surface code field on your Insert dialog then you do not need it.
Both dialogs have fields where the user can enter the code for a specific group to be used in the estimate. At this time you do not know group codes and in fact it is not necessary to memorize group codes. Clicking on the Book icons will open whatever database you are trying to access from a dialog screen.
·Take your mouse and click the Group Code book on the Insert Group dialog open on your screen at this time.

Pictured above is the opening screen for the Roofing Group database, obviously if you are not a roofer your screen will be different everybody should have four Generic (Area, Length, On-Center and Count) Conditions with their system.
·Scroll down until you see the red, purple or fuchsia colored line titled GENERIC CONDITIONS, highlight the Area Condition with your cursor.
·Now take your mouse and click on the .Select icon.
·The condition you highlighted should be copied and inserted into your Conditions screen.

The last step in setting up a condition prior to measuring is to enter the specifications for the condition you plan to takeoff. For example a roofer may enter the number of plies, an interior contractor then length of studs, a fireproofer the thickness of the insulation, an acoustical contractor type of tile, a painter color of paint, etc. This is done by editing the Conditions Property dialog, Please press F% or click the Condition Properties icon.

ictured above is the Generic Area Conditions Property dialog screen. It is one of the simplest condition properties screens. There is only one field where the user can enter information affecting the final quantity and that is the Vertical height or Thickness field. A roofer could use this for tear off. An Interior contractor for volume of a wall or ceiling.
With the exception of the four Generic Conditions (Area, Length, Count, On-Center) all other Conditions are trade specific.
You can also safely assume that the fields you will be filling in are directly related to your work and the conditions you will be estimating.
Some pages may have only a few conditions on it and others will have many, it all depends on the job, the complexity and the level of detail you need to correctly estimate the work. A Roofing contractor typically only has one page to an estimate though that page may thirty to fifty conditions on it. Drywall contractors on the other hand can have hundreds of pages and maybe six to ten conditions per page.
Most contractors will use the Generic conditions to quantify such things as Travel, Misc Labor Expenses, Equipment Rental and Lump Sum Subcontract work. They have been set up in your supplied database, you may need to give them a tweak but generally speaking they are pretty much ready to go.