![]() Estimating Edge’s team of experienced construction professionals and software engineers have developed the industry’s smartest takeoff and estimating software solutions for competitive estimates.
Estimating Edge’s team of experienced construction professionals and software engineers have developed the industry’s smartest takeoff and estimating software solutions for competitive estimates.
Don’t just estimate faster. Estimate better.®
- /
- /
- /
Navigating EDGE On Site
Learn how to navigate throughout the EDGE On Site construction management application and focused on the view that you will see on almost every screen, all the settings tools and tricks of all the different views of the application.
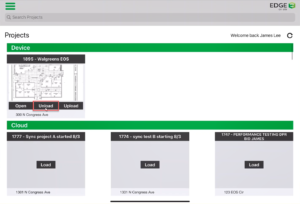
Projects Screen

- The first screen when logged in to the application. Click here to watch how to Load a Project.
Note: The Cloud is where all the projects sit and that data is stored in the cloud and once Load is selected it’s pulling from the cloud to the local device in order for to track and input data.
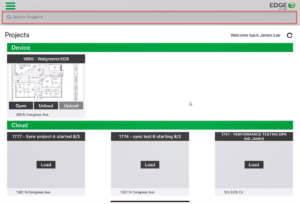
Note: At the end of the day, once all the data is uploaded. It is time to unload the project, send it back to the cloud. - Use the search bar to search for a project by ID number or name of project.
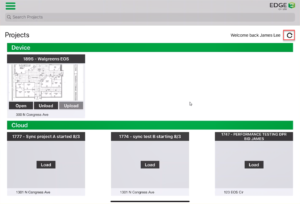
- If the project is not there, click the refresh button.
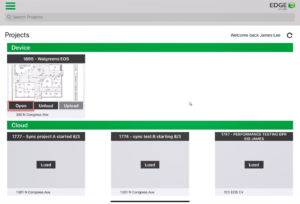
- A pop-up will appear informing the user the application is processing.
- Click Open to view the project.
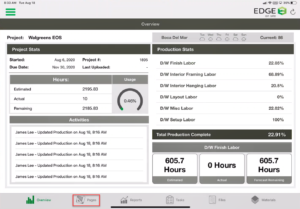
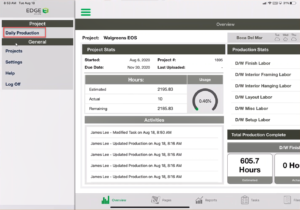
Overview Screen

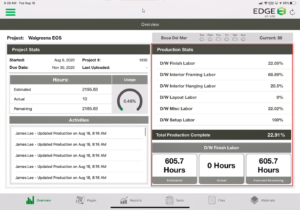
Note: Once you open the project you see the projects overview screen. The overview screen contains general, and at-a-glance useful information anyone in the field can reference.
- The project name is located in the top left.
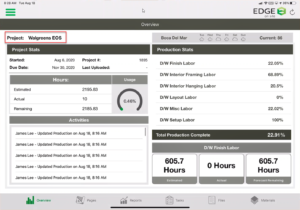
- Below that there is some information that was inputted when the project was originally, which was the start date, the finish date, and a unique project number that our system assigned.
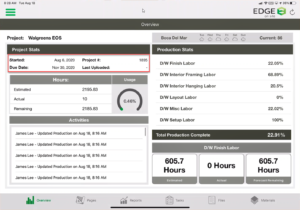
- Hours and Usage section are located on the left-hand side of the screen.
-
- Estimated are the total estimated hours come from The EDGE.
- Actual is the hours the user is inputting into the iPad.
- Remaining is the balance by subtracting actual from estimated. Formula: Estimated – actual = Remaining.
- The Usage showcases the percentage of how many hours have been used. Formula: actual/estimated = usage.
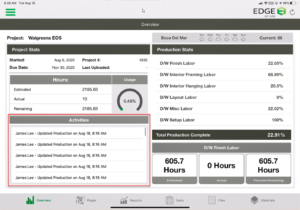
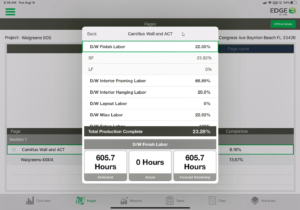
- Activities section informs any action taken during the project in the project. e.g., change order, production, or image added.
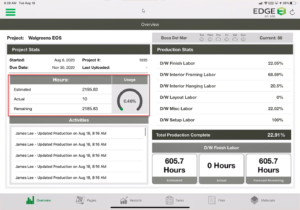
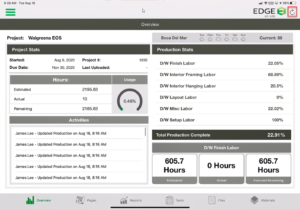
- The Production Stats section out all your cost codes. On the right side of the screen, there is a list of codes and based on how the business tracks you can choose User, Account, or Phase. These codes are from The EDGE estimate and can be customized within the Administration Portal.
-
- Tap where it says drywall finished labor.
- See is the units of measurement inside this code.
Note: See code is selected because there’s a green box around it. - At the bottom, see drywall finish labor and more information inside these breadcrumbs. How many total hours of work left for drywall finished labor, how many hours actually inputted for that labor, and if work continues at the rate how many hours left over.
- The percentage here is based on quantity completion.
- Example, if we want to get a picture of that we can look at the units of measurement and say we got about 4500 square foot of finished labor, actually done about 1068 and if work continues at this rate, this is how many square feet I have remaining, same for lineal footage.
- In the top right of the screen, there is a refresh button.
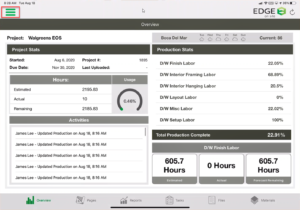
Menu Button
The Menu button will give the users the option to go back to the project screen, settings, help, or the ability to log out of the application.
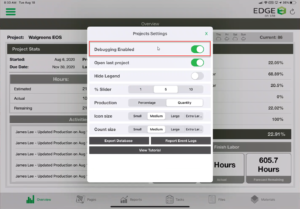
- If the settings button is hit a pop-up will appear with a few different toggles.

- Leaving the “Debugging Enabled” toggle on means that whenever an error is produced within the application an internal message is sent so we can investigate.
- Leaving the “Debugging Enabled” toggle on means that whenever an error is produced within the application an internal message is sent so we can investigate.
Note: The other settings will be covered a little later in the video. - Click the Page tab at the bottom to learn more about the Page Screen.
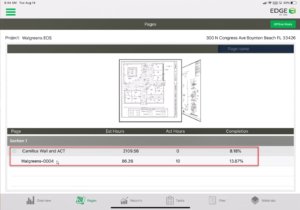
Pages Screen
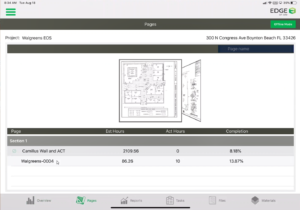
The pages header at the top, the address of the project, and ability to search by a page name. A list of all the sections and pages in this job are displayed.
Note: If there were more sections there would be a second gray header that says section two. If section one it tapped, it’ll collapse all the pages inside of the section.
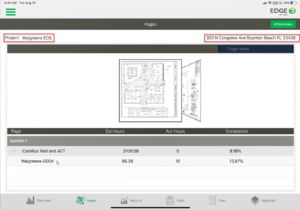
- As well as page description, which is coming right from The EDGE. Along with the estimated hours per page. The actual hours that have been inputted for these pages, and then a quantity completion percentage. There is a preview of the background image for the page coming from The EDGE, and it’s an interactive carousel that can be swiped to view the other pages with one’s finger.
- Now, this screen is where the user downloads their pages, please visit Download Pages for more detail.
- Another feature is the Long-Press Feature. If the user presses on the title of the page for 3 seconds a pop-up will appear. The pop-up will look similar to the Overview Screen information, except the information is only for the selected page.
- Select a page to begin tracking production.

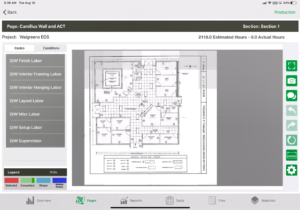
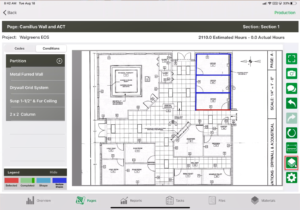
Track Quantities Screen
Note: We have a video detailing how to track quantities. Click here to watch.
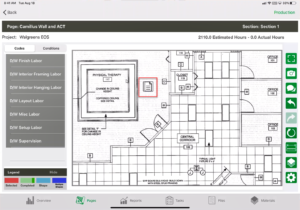
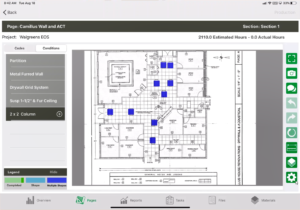
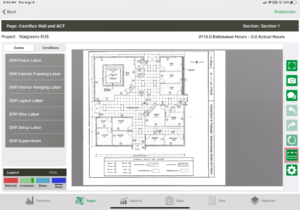
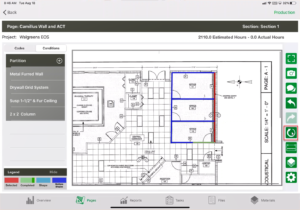
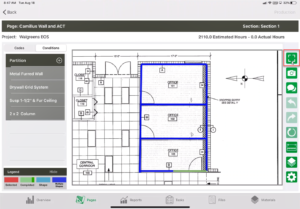
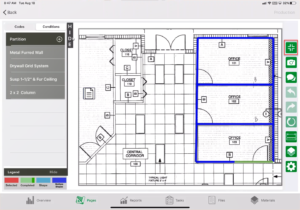
In this article we will focus on the little tools and tricks of this screen. On this screen, the title of the page and project will be displayed in the left-hand corner. Across will be the estimating hours, carried over from The EDGE. A list of codes on the left which can be switched to a list of conditions. If a code or condition is tapped the shapes that are associated with them will become visible on the blueprint. Below the Code/Conditions is a Legend which gives the user can understand of what the colors the shapes are turning means. If the Legend is in the way, click Hide. If the Legend is needed, click Show, to have it appear again.

Toolbar Inside of the Tracking Quantities Screen
On the right-hand side of the application there is a toolbar with different icons. Let’s cover what each one means and does.

- Settings – Inside of the settings tab the user have the ability to:
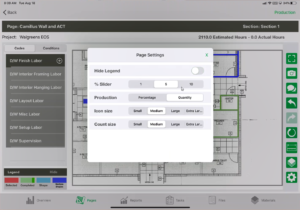
- Hide Legend give the user the ability to hide the Legend, just another option then hitting the Hide button.
- % (percentage) slider gives the user the ability to use the production slider in one, five, or ten set intervals.
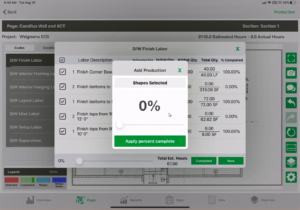
- Production allows the user to pick if they will show percentage or quantity. This is shows when the user tapped a shape, tapped on Production, and tapped on a Total Qty. fraction. A pop-up will appear now with a slider to add a % complete to the selected item.
- Icon Size grows the icon on the blueprint. The icon is the notes, comments on the blueprint. When the user selects a larger icon size those icons will become larger.
- Note: to learn how to add a photo or note click here.
- Note: to learn how to add a photo or note click here.
- Count Size is similar to the Icon Size if a count condition is selected they appear a lot larger if the user selects a larger size.
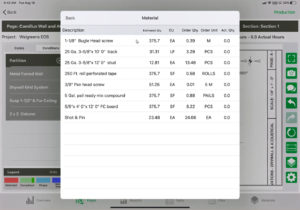
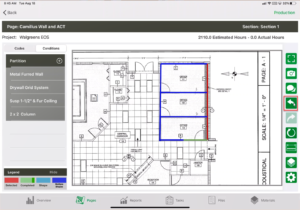
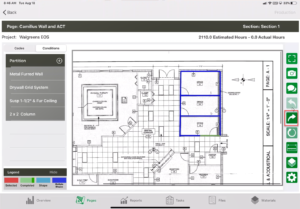
Viewing Material By Shape
- Tap on a code or condition
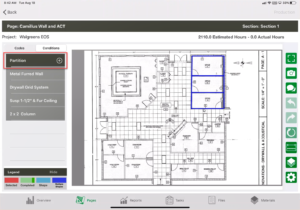
- Select a shape or multiple shapes.
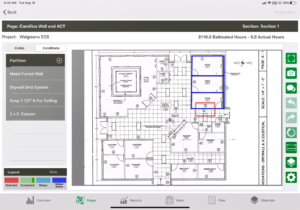
- Tap on the viewing material by shape icon.
- A pop-up will appear showing all of the material for this shape coming right from The EDGE estimate. Estimated Quantity, Estimating Unit (EU), Order Quantity, Order Unit, and Actual Quantity.
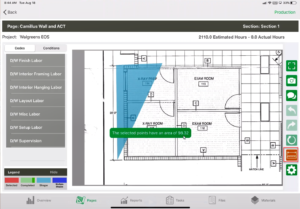
Measurement tool – allows users to get a measurement from any two or more given points on the blueprint here.
- Tap the measure tool icon.
- Tap one point using a finger.
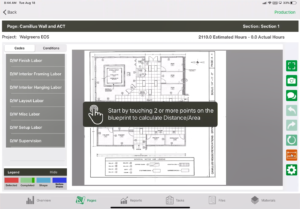
- Then tap the other point.Note: This will continue giving the user the area of the 3 points and continue until the measure tool icon is tapped.
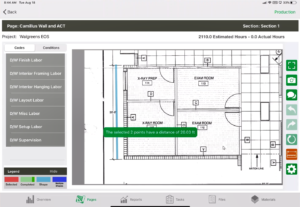
- Tap the measure tool icon to stop measuring.
-
- Undo – The user selects a shape then click the undo button, it is going to unselect the shape.
- Redo – If the redo button is selected it is going to reselect the shape.
- Clear – If the clear button is selected, it is going to clear all of the unsaved production.
- Notes – Learn more about Notes by clicking here.
- Photos – Learn more about Photos by clicking here.
- Full Screen – gives the user the ability to maximize the view for the blueprint by hiding the code/condition.
- Undo – The user selects a shape then click the undo button, it is going to unselect the shape.
- The user can view the code/condition by click the SHOW tab on the left-hand side.

- To exit the full screen, view the user will have to press the Fill Screen icon again.
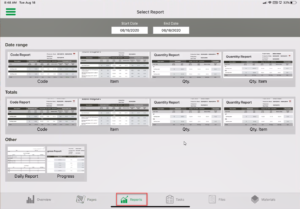
Report Screen
Reports are broken down into three sections: Date Range, Totals, and Other.
Note: To watch more about the report screen visit Reports.
Tasks Screen
Note: To learn more about the task list click here.
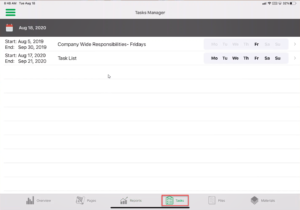
Tasks can be added through the Administration Portal by office personnel. They create lists of checklist items to be checked off by field personnel to say that certain items were accomplished and so the completion of tasks by marking a checkbox communicates back and forth through the Cloud with our Administration Portal. Offers some accountability, things like that. When the user is creating a tasks list there are three different ways to do it: per specific project, company-wide tasks, and individual task list.
In this example, there are the different task lists, and the user have the ability to see when the tasks list is active by dates (Monday, Tuesday, Wednesday, Thursday, Friday, Saturday, or Sunday).

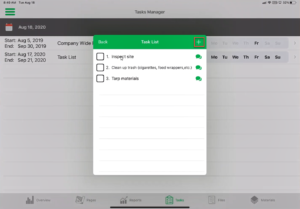
- To look inside at what tasks are inside the task list tap the task.
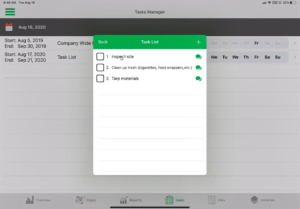
- The user will see the different tasks with the ability to check the off, comment on the task which will be sent through the Cloud to the Administration Portal to notify office personnel, and the ability to add additional tasks by tapping the +.
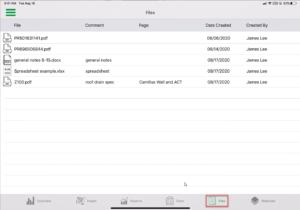
Note: To learn more about the File Screen, click here.
The File Screen is a central location for all document types. All image types that can be added either from the Administration Portal, or the iPad. It is a two-way communication.
In this example, there is a mix of everything in there. Some PDFs, you can add Word documents, spreadsheets, and the user can also add a multitude of different image files PNGs, JPEGs, TIFF files are among the acceptable ones.
Users will also have the ability to view the comments that are attached to the file. The type of file and the date stamp will also be ability for the user to see. If an image was added directly to a page the user will see which page it’s coming from.
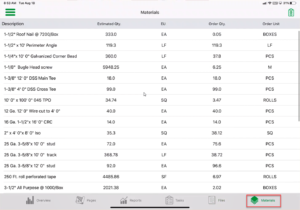
Material Screen
Material Screen is a list of all of the material coming from the estimating. It is not filtered by page, shape, or form. It’s a comprehensive list of all of the material on the job site. This screen is for the user who wants to acquainted to make sure you’ve got everything.
The only other navigation to do on this screen is if the user clicks the top right clipboard icon a purchase request will appear. To learn more about this, click here.
Daily Production:
- To access the Daily Production that the user has not uploaded yet, the user can click on the menu button.

- Tap on Daily Production.
- Tap Upload.
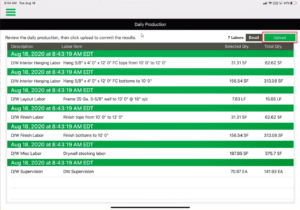
- To learn more, click here.
Once the user is finished with the project.
- The user will click on the menu button in the top left.

- Click on Project.
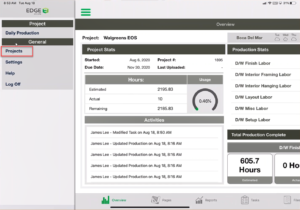
- Find the project.
- Click Unload. Sending the project back to the Cloud to collect and new information from the Administration Portal.