![]() Estimating Edge’s team of experienced construction professionals and software engineers have developed the industry’s smartest takeoff and estimating software solutions for competitive estimates.
Estimating Edge’s team of experienced construction professionals and software engineers have developed the industry’s smartest takeoff and estimating software solutions for competitive estimates.
Don’t just estimate faster. Estimate better.®
- /
- /
- /
Multi Code Functionality
Purpose: To understand a new tool that can be used to efficiently track production across multiple cost codes at once.
Note: This video is for more advanced users and requires knowledge of how to activate a bid for EDGE On Site, how to navigate the iPad application, and how to track quantities. If needed, reach out to a sales representative to schedule initial training if you haven’t already. Also, you can find that information in our LMS or knowledgebase material.
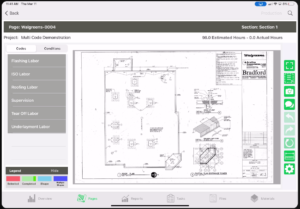
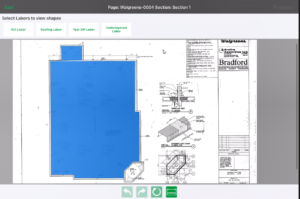
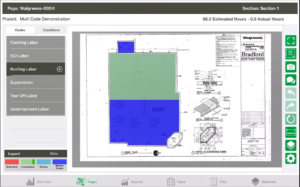
- Start on the tracking screen of any page, shown below:
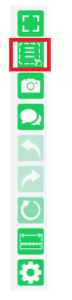
- Tap on the multi-code tracking button on the right toolbar. It is the second icon from the top, just beneath the full screen tool:
- A dialogue will appear prompting the user to select which codes they want to be able to track against at the same time. The user can tap each box to select that code, or use the select all button to select or deselect all at once:
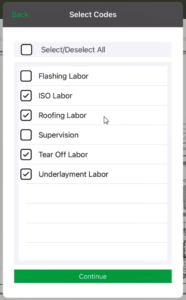
- Once all the correct codes are selected, the user should tap “Continue”. This is the screen they will be taken to:
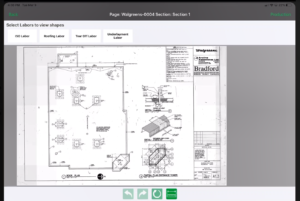
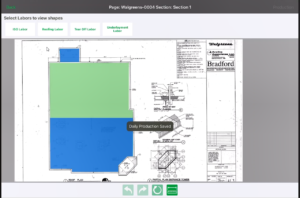
- The user sees a tile for each code that they selected in the previous dialogue. The next step is to tap on each tile to activate each code, turning the font from black to green as a visual indicator. Here is an example of an activated tile:

- Tapping on a tile to activate the code will bring its related takeoff shapes into the display, as shown below:
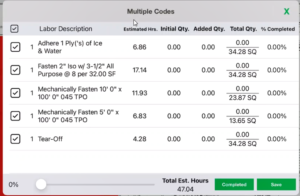
- The next step is to begin tracking. Once all the proper codes are activated, this screen will offer all the same functionality as the normal tracking screen. The user can select the shape and use the crosshairs, production slider, or manual entry to track quantities.
- Below is an example of the production screen once a shape is selected. We are seeing labors from across multiple different cost codes and even from different conditions. Note: this view is also great for planning out in the field, specifically in terms of referencing the “Estimated Hrs.” field. This data shows how many hours it should take to complete a labor based on the Edge estimate. We total up those numbers at the bottom as well, where it says “Total Est. Hours”.
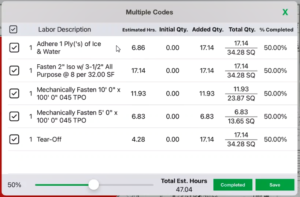
- Once the production window is open, the user can use the production slider to apply production to all these labors at once, showing the efficiency of tracking with this tool:
- After “Save” is hit, production will store as normal, with green shading indicating the completion we marked in the production window:

- To leave the multi code feature and return to the normal tracking screen, hit the “Back” button shown here:

- The last important concept to understand is that any production marked on the multi-code tracking screen will also show up on the standard project tracking screen, and vice versa. For example, the production marked on the multi code screen shown here:
- Will also show up here when the back button is hit, as long as the same code is selected:
This also works in reverse. Any production that was marked on the standard tracking screen shown above, will also appear on the multi-code screen so that the data is always up to date.