![]() Estimating Edge’s team of experienced construction professionals and software engineers have developed the industry’s smartest takeoff and estimating software solutions for competitive estimates.
Estimating Edge’s team of experienced construction professionals and software engineers have developed the industry’s smartest takeoff and estimating software solutions for competitive estimates.
Don’t just estimate faster. Estimate better.®
- /
- /
- /
How to Use EDGE On Site?
Description:
EDGE on SiteSM extends the power of The EDGE® estimating software into the field giving users the power to monitor production progress on a real-time basis. EDGE On Site brings the estimate, blueprints AND change orders to the field. Teams can avoid costly mistakes by always having the right blueprint details or see the exact point when production will go over budget. Foremen have virtually zero data entry since EDGE On Site does the heavy lifting; project managers have real-time insight into job performance without unnecessary reports from the field. Estimators can use the project results to be more competitive on future bids.
EDGE On Site Workflow:
-
-
- Activate the original estimate as soon as you’ve won the bid.
- Track production marking the completion and collaborate by inputting notes and images.
- Viewing reports and sending daily production for real-time progress.
-
Importance of Tracking Against the Estimate
Cost Control – Field managers and foreman see real-time actuals and can course correct when labor exceeds the budget.
Goal: Project costs equals or is less than the project budget.
Historical Data – Greater insight into job and crew performance and tighter future estimates.
Project Completion – Track overall project percent complete by comparing job progress to the original estimate.
Tool Kit:
-
- iPad:
- iPad 5th Generation and Beyond- Wi-Fi or LTE, 64GB and up, Running IOS 12
- iPad Pro all generations- Wi-Fi or LTE, 64GB and up, Running IOS 12
- Stylus pen (if necessary)
- iPad:
Instruction:
Let’s go through the steps for using EDGE On Site:
-
-
- Log-in to EDGE On Site using your Portal credentials (username and password).
-

-
-
- Load the project onto the iPad.
Note: Cellular Service or WI-FI is necessary to load a project to the device. Once on the device, projects no longer need connectivity.
- Load the project onto the iPad.
-

-
-
- Tap Open to view more details on the project.
-

-
-
- The Overview is the home page of the project and production stats.
-
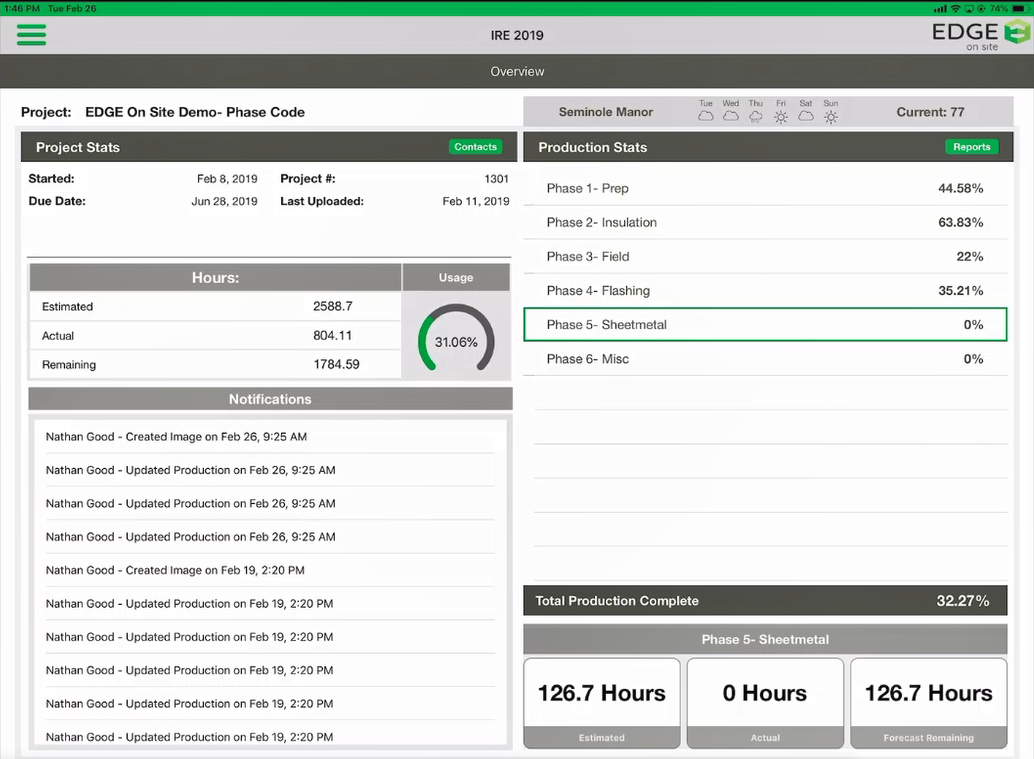
Once you open the project you see the projects overview screen. The overview screen contains general, and at-a-glance useful information anyone in the field can reference. Hours and Usage section are located on the left-hand side of the screen.
-
-
-
-
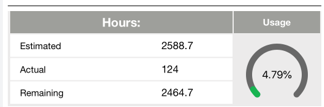
- Estimated are the total estimated hours come from The EDGE.
- Actual is the hours the user is inputting into the iPad.
- Remaining is the balance by subtracting actual from estimated. Formula: Estimated – actual = Remaining.
- The Usage showcases the percentage of how many hours have been used. Formula: actual/estimated = usage.
-
-
-
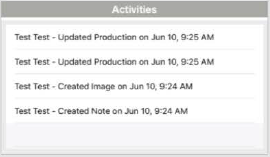
Activities section inform any action taken during the project in the project. e.g., change order, production, or image added.
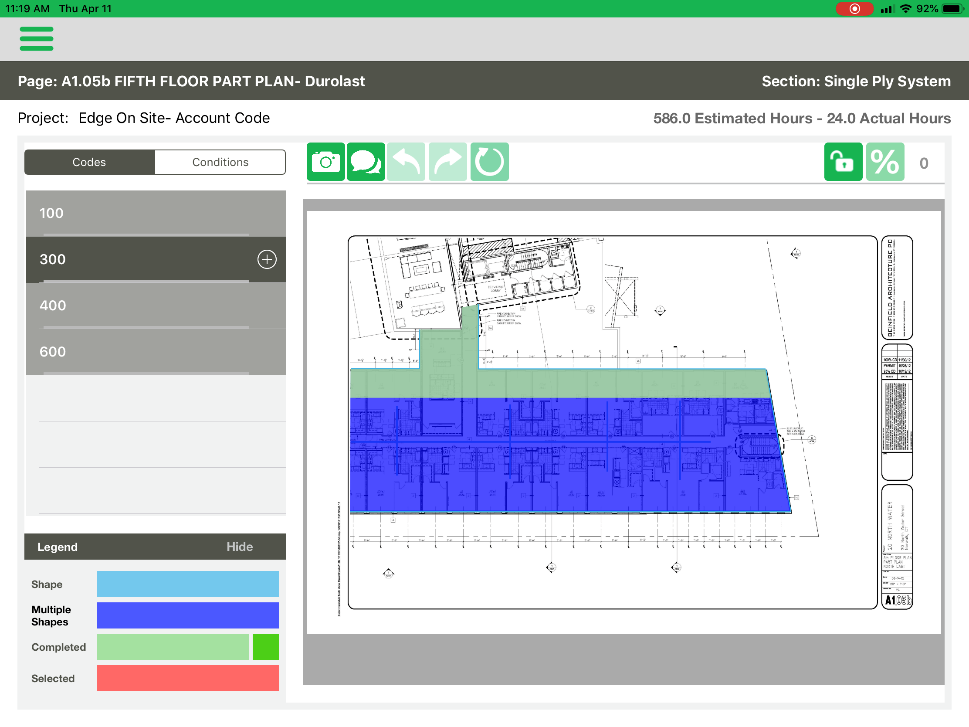
The Production Stats section out all your cost codes. On the right side of the screen, there is a list of three codes and based on how the business tracks you can choose User, Account, or Phase. These codes are from The EDGE estimate and can be customized within the Portal.

In this example, we will look at Phase Codes. By clicking on “Phase 5 – Sheetmetal” code. The production details are displayed in the section below. These details will change based on which Production Stats option you click on.
-
-
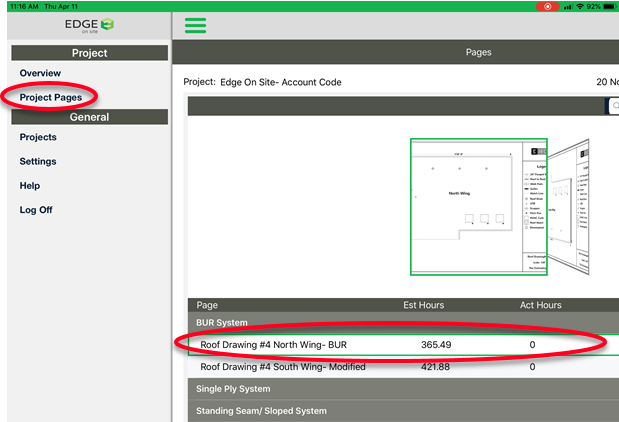
- To select a page (blueprint), click the menu icon
 Tap Project Pages and slide the carousel using your finger. A green box appears around the selected page and associated details.
- To select a page (blueprint), click the menu icon
-
-
-
- Tap the page preview or description to open the page (blueprint).
-

-
-
- On the page view, the user can zoom in and out by using the pinch gesture on the screen.
-


-
-
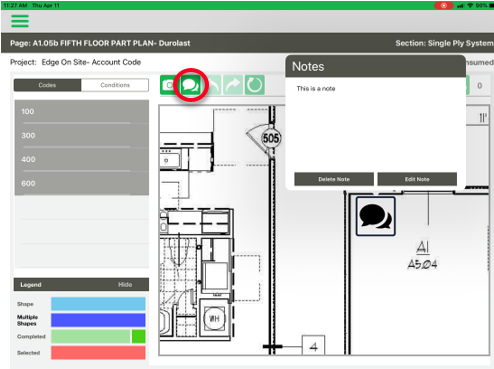
- For collaboration, users can take photos or notes and place them anywhere on the blueprint page. These can then be viewed by anyone with access to The EDGE administrative portal.
-

-
-
- On the left-hand side, displays the list of codes. Tap the code to view the details and/or add production.
-
-
-
- Tap the plus icon to display each individual labor item. If a specific labor item is selected, the corresponding shape will only be displayed.
-

-
-
- Adding Production to the Page or Item
The feature gives an accurate percentage complete allowing the project to be adjusted according. You can add the labor completed to:
- Adding Production to the Page or Item
-
-
-
-
- A Code or
- An Item
-
-
Adding labor percentage complete can be done by:
Option 1: Crosshairs
-
-
-
-
- Adding production to a Labor Item.
- Tap the labor item.
- Tap the shape that you want to add production. When selected, the shape turns from blue to red.
- Tap the shape again, the crosshairs will appear.
- Use the crosshairs to highlight (green) the section completed. The numbers above the crosshairs represent percentage complete.
- Tap the Enter Labor
- Adding production to a Labor Item.
-
-
-

-
-
-
-
-
- A list of labor items appears and add the number of workers and hours by tapping on the edit box and typing in a number.
- Tap the Save
-
-
-
-

-
-
- To verify, edit and then send back to the cloud (The EDGE admin portal), click on Daily Production.
- To edit or view page, tap on the labor item. Follow the on-screen instructions.
- To email, tap the Email button.
- To upload to the cloud, tap the Upload button. This allows anyone within your company to view the Daily Production Status, regardless of where they are located.
- To verify, edit and then send back to the cloud (The EDGE admin portal), click on Daily Production.
-

-
-
- At the overview screen, tap the Report button
-

-
- Reports are displayed at a total project level and the data. To view a report, tap on the desired report.