![]() Estimating Edge’s team of experienced construction professionals and software engineers have developed the industry’s smartest takeoff and estimating software solutions for competitive estimates.
Estimating Edge’s team of experienced construction professionals and software engineers have developed the industry’s smartest takeoff and estimating software solutions for competitive estimates.
Don’t just estimate faster. Estimate better.®
- /
- /
- /
Digitizer – Tools User Options Drawing
How To Use – The Digitizer

The Digitizer dialog of the User Options Drawing screen is where the user sets up the pen buttons on the stylus or electronic pen.
Caution: CLICK must always be set to zero.
NOTE: Before attempting to set the Pen/Stylus buttons you must open The EDGE Drawing Screen.
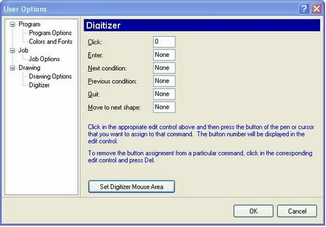
To set a pen button take your mouse and click in the field next to the button you want to set up. Continue to hold the button down and drag the cursor over the word, then place your pen within an inch of the board and press the pen button you want for the choice.
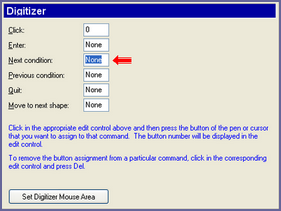
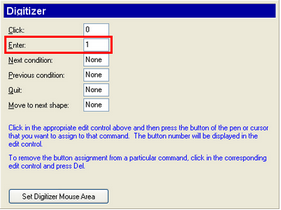
As soon as you pressed the button the assigned button number appeared in the box. In the example to the right each time the bottom button is pressed you will move to the next condition.
Some estimators like to be able to use their digitizer pen as a mouse in the Drawing Screen as well as using it for digitizing. For those users we have created something we call the “Digi-mouse.”
The Digi-mouse pad is shown in the panel below. If your interested, print this page out. Then, using a pair of scissors cut the panel out along the red line.

A typical digitizer board is depicted at the right. The emphasis here is the four border guides. When you place your menu pad you must be inside the border guide. Also you should use the lower right border guide and place the menu +/- 1/2″ inside the guide marks. Just tape the menu to the board with scotch tape. In fact you do not even have to use the menu shown here taping a Post-It note to the digitizer board will work just as well.
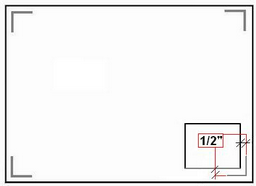
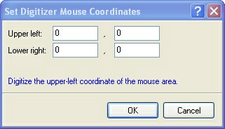
After the menu has been taped to the board, click on Tools | User Options | Drawing | Digitizer | Set Digitizer Mouse Area. This dialog is used to tell the program where the mouse is located. Take your pen and touch the menu at the point labeled 1, then move down and digitize point 2.