![]() Estimating Edge’s team of experienced construction professionals and software engineers have developed the industry’s smartest takeoff and estimating software solutions for competitive estimates.
Estimating Edge’s team of experienced construction professionals and software engineers have developed the industry’s smartest takeoff and estimating software solutions for competitive estimates.
Don’t just estimate faster. Estimate better.®
- /
- /
- /
Copy and Insert
How To Use Copy and Insert In The EDGE
Copy + Insert:
![]()
Another feature in The EDGE that is standard throughout the program is Copy+Insert. This feature when invoked The EDGE Copies the selection the cursor is highlighting and then automatically opens a Paste dialog asking what options you would like to have paste into the new line.
To Copy and Insert a selection click Edit | Copy and Insert or click on the Copy and Insert icon
1.Mark, highlight or click on the page to be copied and inserted.
2.Click the Copy+Insert icon. A dialog box opens, with several selections for you to choose from.
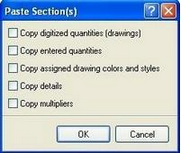
Copy digitized quantities (drawings)
– checking this box tells The EDGE you want to copy all the digitized information from the original page to the new page.
Note:
When you check the box the third line Copy assigned drawing colors and styles turns off. This is due to the fact when you copy digitized quantities the assigned colors and styles are copied as well and can’t be changed.
Copy entered quantities
– checking this box tells The EDGE you want to copy any quantities that were manually entered in the original page.
Copied assigned drawing colors and styles
– checking this box tells The EDGE to copy the colors and line styles from the original page to this page rather than using new colors or styles.
Copy details
– checking this box tells The EDGE to copy any details you may have placed in the original page into the new page.
Copy multipliers
– checking this box tells The EDGE to copy any Multiplier changes from the original page into the new page.
When you have finished making your selections click OK. The Properties dialog for the screen you are working in opens, fill out the information as required and click OK.
Many times it is easier and faster to copy and modify an existing lines rather than adding an entire new one. There are two ways to copy lines. The first is Copy and Paste and the second is Copy and Insert. Both features accomplish the same thing. After you copy and make the desired changes, the program automatically places it in order based on its costing code.
The first step for both operations is the same:
1.Move the cursor to the costing code to be copied, or if required mark the costing code(s) to be copied. Choose the appropriate method below:
Copy and Paste:
2.Click Edit | Copy. The code is copied to the clipboard.
3.Click Edit | Paste.Enter a new costing code and description if needed.
4.Click OK.
Copy and Insert:
2.Click Edit | Copy and Insert.
3.Enter a new costing code and, if you need to, modify the description.
4. Click OK.
Copy & Insert Groups:
Copies the marked or highlighted line(s) and auto opens the Properties dialog for the database. This is the same Properties dialog you would see if you had clicked Insert. All of the same rules apply.
Note:
Group Database: When Copy and Insert is used to create a New Group it only creates an empty group. No Conditions or Items are copied and Inserted. Therefore logically the only thing you are copying and inserting is the Description from the original group.
Create a new Group Code (a descriptor of a group that is unique to each group), no duplicates are allowed. Sometimes, it is easier to create a New Group Description and then use the fist letter of each word. As you will more than likely use the book to find your Group do not fret when trying to come up with an original code for each group
Create a New Description (Name) for your Group.
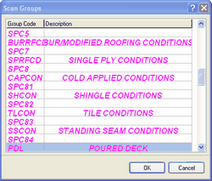
Scan, is used to shorten long lists of groups. The only lines than appear in Scan view are those that have been checked here. Such as the Scan View in the Current Roofing Database. All you see in this case are the purple/fuchsia label lines which in this case are used to divide the Roofing database into workable sections.
The next box is Automatically Pop Conditions When Inserting, what this feature does is automatically open the Condition Properties for every condition in the selected group for editing or modifying.
Note:
This feature works well for trades that select Groups that have one or two Conditions per group. In most case it does not work well from the roofing contractors who can bring anywhere from 15 to more than 30 Condition in at one time. So for Roofer’s we recommend leaving this unchecked
You can also include notes for this group by pressing the Notes button or selecting Edit | Notes from the menu bar. Doing so will open a word processor in which you can type your notes. Notes here might tell someone how