![]() Estimating Edge’s team of experienced construction professionals and software engineers have developed the industry’s smartest takeoff and estimating software solutions for competitive estimates.
Estimating Edge’s team of experienced construction professionals and software engineers have developed the industry’s smartest takeoff and estimating software solutions for competitive estimates.
Don’t just estimate faster. Estimate better.®
- /
- /
- /
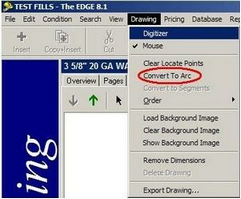
Convert to Arc
How To Digitize An Arc
Arc:
![]()
Occasionally, you are going to run into Arc’s, whether they are radius walls or ceilings they are both digitized in the same manner. Look at the following example, here is a building that has a radius section. The black line represent’s the drawing as received it could be plan view or elevation. The red line shows how the area was digitized.
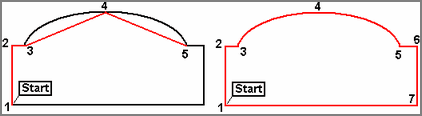
To draw an Arc you must be in Continuous Length or Area drawing mode. If you are not click the Length icon or the Arc icon. After selecting the correct icon, the estimator started digitizing a point 1, then 2, then 3 (he is now at the beginning of the Arc when digitizing Arc’s you need to digitize 3 points on the Arc beginning, middle and end). He then moved to the middle of the Arc and digitized point 4, next he moved to the end of the Arc and digitized point 5. Then he put his digitizer pen down, picked up his mouse and clicked on Drawing | Convert to Arc.
As soon as he did that the points 3, 4, 5 converted from the straight lines on the left to the curved lines on the right. He then finished by digitizing points 6, 7 and then pressing Enter.