![]() Estimating Edge’s team of experienced construction professionals and software engineers have developed the industry’s smartest takeoff and estimating software solutions for competitive estimates.
Estimating Edge’s team of experienced construction professionals and software engineers have developed the industry’s smartest takeoff and estimating software solutions for competitive estimates.
Don’t just estimate faster. Estimate better.®
- /
- /
- /
- /
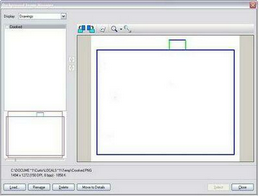
Background Image Manager (v10)
The Background Image Manager
Overview:
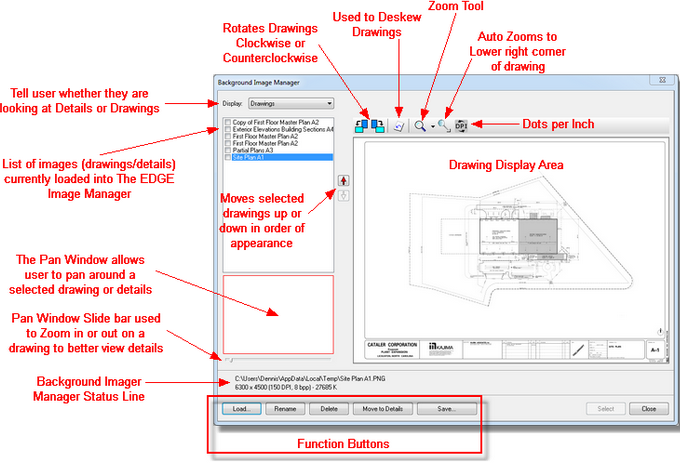
For the past several years estimators have seen a major move towards “electronic plans” and a move away from the traditional paper plans. The reasons for this trend are many financial, ease of reproduction, ability to disseminate revision quickly and easily. Electronic plans can be a single drawing or can have multiple drawings just like a full set of printed plans. In order to help you keep these images organized, and to link them to the appropriate pages, you use The EDGE Background Image Manager. This can be accessed by selecting File | Background Image Manager from the menu bar, from basically anywhere you are in The EDGE. However, we recommend loading your images from the Pages screen as you start a new estimate, the reasoning for this is that while at the Pages screen you can also create ‘new’ pages directly from the downloaded images with having to click Insert for each page required. The table below will walk you through the steps to load images, manipulate images, etc.
Image Manager Function Buttons:
Load – used to load background images from where they are presently being stored.
Rename – allows the user to rename numerically named images to alpha named images.
Delete – used to delete unwanted images from the image manager.
Move to Details – provides the user with a secondary window from which to view plan details.
Save – allows the user to export the drawing to an external file outside of The EDGE.
The BGI Manager is accessed by clicking File | Background Image Manager from the menu bar, regardless of where you are in The EDGE.
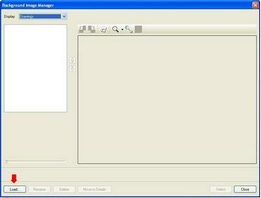
Step 1:
When you open this option the first time in a job, the only option you have is to load an image by pressing the Load button. There is also a separate button for loading Details. It operates and functions in the same manner that was just explained here.
Step 2:
Choosing this action opens the load background image window; open the directory or file where you have previously downloaded your images.
Step 3:
Highlight and select the image name and press the button or hold the Shift key and click on several drawings (this will select all those you have clicked on) and then press . When you are finished loading images press the button.
The Background Image Manger has several buttons, fields and functions which will allow you to manipulate the selected image(s) for you to better estimate the image. Those features, functions and buttons are explained in the following Background Image Manager table.
The selected images are loaded into the Background Image Manager. But, as you can see many times the images come in with a series of indexing numbers which usually mean little or nothing to the estimator. The EDGE allows you to rename these files to something more meaningful. Click the Rename button on the Background Image Manager. Type in the correct name for this drawing i.e. Roof, 1st Floor Framing, Acoustical Ceiling, etc. After entering the description, press the OK. The dialog closes the original numeric name is replaced with the name you just typed in.

Delete, If you have entered an image in error or images you don’t need, press the delete button, and the image will be removed from the job. You can also use this function to delete details.It operates and functions in the same manner that was just explained here.
In the process of downloading images you also downloading some Detail images. Now the Detail are mixed in with your ‘Drawings.’ If you highlight a Detail and then click “Move to Details,” that image is moved to the Details screen. If you accidentally send a Drawing to the Details view, switch to that view highlight the image and click on Move To Drawing.
This button is used to select images appearing in the manager preview list and place them into the main manager screen.
Closes the Background Image Manager.
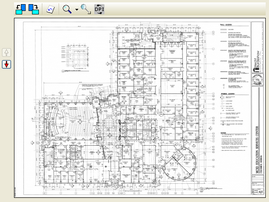
Main Window
– Displays the selected image in the large Background Image Manager window.
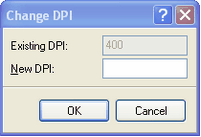
D P I
– The feature changes Dots Per Inch. Revised images or additional images often come with a different DPI setting than the original images. Use this dialog to set the DPI of the new image to that of the original image.
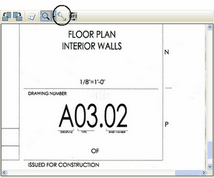
Zoom Lower Right
– It is extremely difficult to read the title block of a new loaded set of plans. By clicking Zoom to Title the EDGE moves directly in the title block where the title of the current drawing.
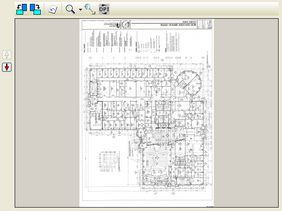
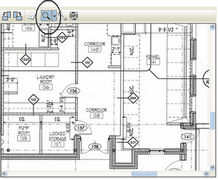
Zoom
– You can use the Background Image Manger to Zoom in or out to look at the drawings a small example is shown at the left.
Deskew
STEP 1:
Images have been known to appeared skewed or as seen in the example “tilted”. The EDGE can fix this problem as well. Click Deskew and digitize a line. The EDGE will reset the drawing.

STEP 2:
Click the Deskew button. With your mouse, click two points on the Background Image. Click on the first point of the Background Image. When you click your first point, a pink line will appear from that initial point. Move your mouse around until the pink line traces over the crooked line on the image.
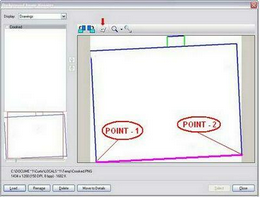
STEP 3:
When you select the last point, the image will automatically deskew.
Rotate Images
For reasons unknown to mankind horizontal images are received in a vertical format and vice versa. Some have been received upside down. No problem, with The EDGE you have a choice you can rotate the drawing clockwise or counterclockwise whichever is the easiest and fastest way to get the image into the required position.

Drawings/Display
This toggle switch will switch you between the Drawings screen and the Detail screens of the Background Image Manager. This allows you to have a screen for drawings and a separate screen to manage your detail pages.
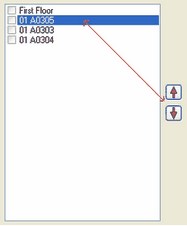
Image Manager Table of Contents
This is the small, white, vertical rectangular are where the list of drawings appear in the top left corner of the image manager dialogue.
Organizing Images
This feature allows you to reorder the images as they appear in the Image Viewer Table of Contents. To reorder an image highlight it and then click the Up or Down arrows the image will move one line every time you click.
Plan Preview Window
This is the small window in the lower left corner of the manager. You can move around the preview image to check that you have selected the correct drawing.
Plan Navigator Slide Bar
The Navigator allows you to move around the selected image. You can also use the Navigator in conjunction with Zoom and move in close enough to read the drawings. Moving the slide to the right increase the Zoom (In) level while moving to the left decrease (Out) Zoom level.