![]() Estimating Edge’s team of experienced construction professionals and software engineers have developed the industry’s smartest takeoff and estimating software solutions for competitive estimates.
Estimating Edge’s team of experienced construction professionals and software engineers have developed the industry’s smartest takeoff and estimating software solutions for competitive estimates.
Don’t just estimate faster. Estimate better.®
- /
- /
- /
Miscellaneous Screen
The Miscellaneous Tab
Overview:
The Miscellaneous dialog is a place where you can create and store items “on the fly.” These are items that crop up once in a hundred jobs and rather than cluttering up your item database you can quickly add such an item here. Another use for the Miscellaneous dialog is a place to store and quickly retrieve miscellaneous items that vary from job to job or from application to application. For example in the roofing database there are over a hundred different types of primers, sealants, etc. rather than having to look all over the item database trying to find the right primer for the estimate just go to the Miscellaneous database scan for Primers and select the product you want. This theory holds true for all of the other trades as well.
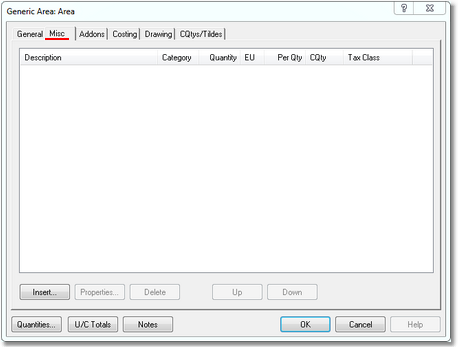
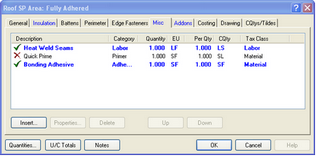
The figure below shows what an empty Miscellaneous screen looks like. There is no limit to the number of Miscellaneous lines you can have. In Figure 791 below you see a partially filled in Roofing Miscellaneous screen. The Green check mark indicates the item is turned ON and will be included in the estimate. The middle item with the Red X is said to be OFF and will not be included in the estimate. So one feature of the Miscellaneous screen is the ability to turn items on and off very quickly by simply clicking on the symbol, a single click will turn a line On of Off.
Common Condition Buttons:
Insert:
Example – Add a Miscellaneous Bonding Adhesive item to an estimate. Allow 1 sq foot of adhesive for every sq foot of roof area.
Begin by clicking the Miscellaneous Tab of the Single Ply Area Condition. Insert is used to add or insert a new Miscellaneous item, click Insert.
The Condition Miscellaneous Properties dialog opens.
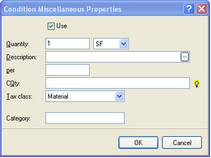
Use (Checkbox) – Using Figure 3 above. Start by checking the Use checkbox. If checked you’re telling the program you plan to use this item in the estimate, it is the equivalent of a green check mark. If not checked the item is considered off.
Quantity – Enter in this field the number of units of an item you want per each EU (Estimated Unit), next field.
Estimated Units (Drop Down)
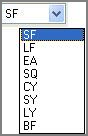
Presently, there are eight (8) different Miscellaneous Lookup databases. This is where the Miscellaneous Tab Lookups vary from the Lookups Database or Type fields. When creating a Miscellaneous item you will select one of the EU (Estimated Units) shown here. Each one of these eight units is a separate Lookup database. These eight are incorporated into the main Lookups Database but they do not mix or share information with the other Lookup databases.

In the figure above we’ve printed a partial list of the 89 databases in the Lookup drop down down list. Additionally we have highlighted three of the eight Miscellaneous (Misc) databases. In the specs we were told to allow 1 SF, therefore select SF for the Estimated Units.
Description – This field holds the description for the Miscellaneous item. There are two methods whereby you can enter descriptions for a Miscellaneous item.
1.You can simply type in a description and the rest of the information, click ok and go estimate. It will work for this estimate but that Misc item is not saved to the database and therefore not available again. It has to be reinvented every time it is needed
2.The other and preferred method is to click the Lookup database buttonand open the Lookup database that is mated to the EU (Estimated) Units above. In this case the description you would be opening a Lookup database where the items inside are all based on an estimated unit of square feet
– Click the database icon the SF Lookups database opens. At the top of the window click the Scan now look for and then highlight the Adhesives Category click OK
– For the time being just select generic Bonding Adhesive.
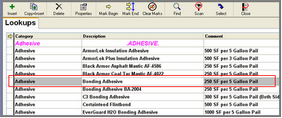
– In the figure above we see the Lookups database screen. The Category and Description fields sort their entries Alpha-Numerically. The Comment field holds a very brief comment.
– Highlight Bonding Adhesive and click the Select icon
– The Lookups database closes and you are returned to the Condition Miscellaneous Properties dialog window.
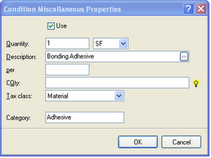
Per – The Per field is a link between the Quantity and EU fields and the CQty (Condition Quantity) field. Some examples, 1 SF per 1 SF, or 6 LF per 1 SF or 4 EA per 2 SF. This quantity will relate how much of the miscellaneous item you will need for every unit of condition. In this example we want 1SF per 1SF.
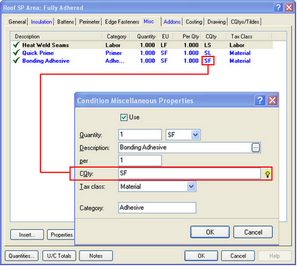
CQty Miscellaneous Lookup – The CQtys icon opens the quantities window. The fields here allow you to view the quantities (CQty’s) that will be calculated for this condition. You can only view them here. If you want to assign one of these to a particular item, you must access it from the Item’s CQty field.
CQty – Displays the CQty code for the condition. These will vary from condition to condition.
Description – Provides a brief description for each line. If you believe a quantity for an item is incorrect or not being properly reported, this is usually a good place to start looking. Many times the wrong CQty code for the item is being used.
Quantity – Displays the numerical value of the CQty code. If there is no value in this field, then it was not measured or setup information was not entered in the condition properties screen.
– There is a shortcut that will open the CQty list for the current selection you are on that shortcut is you will find it in numerous places throughout The EDGE
– To select a C-Quantity click the CQty iconat the end of the field. The Miscellaneous CQty Builder opens.
– The specs tell to allow 1 SF of adhesive for every SF of roof, the first CQty under General is SF. Highlight SF, click the Insert button (lower left corner) and then click OK.
Tax Class – When creating Miscellaneous items you need only to concern yourself with three classes (eg. Material, Labor or Material and Labor). If need be these can be amended later at the pricing screen.This is the last of the fields the user has to fill in. The default setting is Material, if the Misc item is Material there is nothing to do. If it is Labor or L&M you have to change the selection.
Category

The Category field is an optional field, but it is strongly recommended you take advantage of it. The Category field organizes your Lookup Database into a logical order. This will fill in automatically assuming your database has setup categories. If not it will remain blank.
When finished your Miscellaneous Screen and Condition Miscellaneous Properties should look like Figure 10 below:
Properties:
The Miscellaneous Properties dialog is the same as the Miscellaneous Insert/Add dialog above please refer to the previous topic directly above.
Delete:
– Open the Miscellaneous Tab.
– Highlight the miscellaneous line you want to Delete. Click the Delete button.
– The highlighted line is deleted.
Up / Down
The and buttons are used to rearrange the order in which the Miscellaneous items appear on the dialog screen. Highlight an item and click the Up or Down arrow until it relocates to where you want it.
On / Off
One of the really nice things about the Miscellaneous dialog screen is that it will allow you to keep a permanent list of Miscellaneous items stored in the Condition at all times. A check mark to the left of the item means that it is turned ON and will be included in the estimate. An X mark indicates the item is turned off and will not be included in the estimate. You can turn items On or Off by just clicking on them one time. A toggle switch will either turn the item on or off