![]() Estimating Edge’s team of experienced construction professionals and software engineers have developed the industry’s smartest takeoff and estimating software solutions for competitive estimates.
Estimating Edge’s team of experienced construction professionals and software engineers have developed the industry’s smartest takeoff and estimating software solutions for competitive estimates.
Don’t just estimate faster. Estimate better.®
- /
- /
- /
How To Use Link To Schedule
How To Use Link To Schedule
Link to Schedule:
The Link to Schedule feature was designed with the interior Contractor in mind. On large jobs you may encounter numerous wall types and you will even run into wall types within wall types i.e. you might have a Wall Type designated as W-1 and within W-1 there might be W-1a , a W-1b, etc. and we also know that architects have no problems attaching notes in the middle of a set of drawings that may affect something you estimated back on the 3rd, 5th and 9th floors. Wouldn’t it be nice that when you run into crazy situations like this you could make all your changes in one place at one time.
With Link to Schedule you can, Link allows you to electronically hook conditions together. This means if you have to make an adjustment to the condition’s setup it will adjust all the walls types that are linked together. Conditions that are linked can also be unlinked in case you have to change one but not the others.
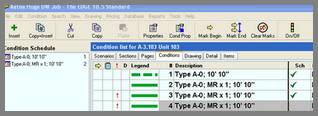
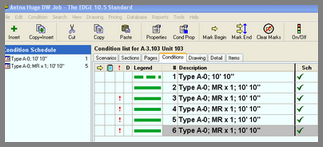
A Condition List screen prior to Linking Conditions. You must be in the Condition List in order to Link or Unlink Conditions.

If you do not have it opened click on View | Condition Schedule. Once you can see the Schedule you can now proceed to highlight a Condition you want to create a link with.
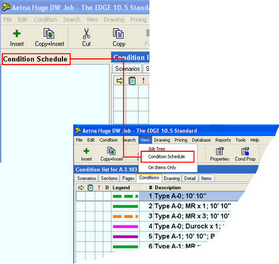
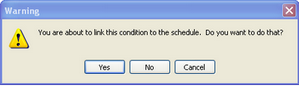
With your mouse click on Condition | Link to Schedule. The warning message to the right appears. Assuming you want to Link click Yes.
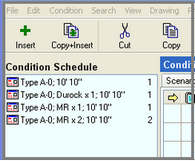
You can Link as many conditions as you like, The Linked conditions will appear on a list on the Condition Schedule. The number to the right of the Condition description tells you how many times the condition is linked to other Conditions in the job.
The way you add a Linked condition to the Condition List is to place your mouse pointer over the Condition in the Condition Schedule, hold down the Left mouse button and drag the Condition onto the Center of the Condition List screen and then let go of the mouse. The Create Condition from Schedule opens. Make any changes you need to and then click OK. The Condition is added to the screen.
The next few panels will cover deleting Linked Conditions. Before that however, look at the last column of the panel to the right. A check mark will appear next to every condition that is linked.
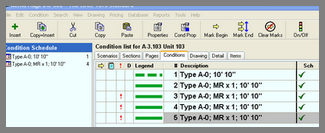
Deleting/Cutting Linked conditions is very much the same as any other place in The EDGE. In the right panel, line 6 is highlighted, taking the mouse and clicking on Cut produces the following result.
Line 6 is Cut/Deleted your choice, that can be confirmed by looking at the panel there are only 5 lines now instead of 6. Also look at the Condition Schedule. In the previous panel the Condition was Linked 5 times, now it is Linked only 4 times.
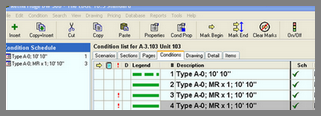
Another way to Cut or Delete is to highlight the Condition in the Condition Schedule then move your mouse over Cut and Left click. The last Linked condition is cut and the number of Linked Conditions is reduced to 3.
As Linked Conditions are based on the original setup there are very few fields you can change without having to create a new link.
In the right panel the Stud centers was changed from 16″ on-center

When OK was clicked the following message appeared.
The Schedule immediately see there is a change and the Conditions no longer match. Two choices, Click YES and all the Condition Linked to this Condition are changed to 24″ On-Center Stud spacing. Click NO and only this Condition is changed and unlinked from the others.

Final panel – the Condition on line 4 has been unlinked also the number of links shown on the Condition Schedule has been reduced to 2. Finally, the check marked has been removed from the Sch column.