![]() Estimating Edge’s team of experienced construction professionals and software engineers have developed the industry’s smartest takeoff and estimating software solutions for competitive estimates.
Estimating Edge’s team of experienced construction professionals and software engineers have developed the industry’s smartest takeoff and estimating software solutions for competitive estimates.
Don’t just estimate faster. Estimate better.®
- /
- /
- /
Tapered Insulation Condition
Tapered Insulation Module
Overview:
NOTE:
The EDGE Tapered Insulation Module is an optional program. It is not a part of the standard EDGE program, it is an additional purchase. If you have purchased the Tapered Insulation Module all of the setup should have been done at the time your system was installed. If you purchased the module and you do not see the Tapered Insulation Condition listed please call EDGE for assistance. If you did not purchase the module and are interested in its features please call your representative for an on-line demonstration. Thank you.
The Tapered Insulation Module:
The Tapered Insulation module allows the estimator to get detailed tapered information quickly and easily, such as the number of individual tapered boards (A,B,C,D,E,F etc), total filler boards, number of individual cricket boards (Q), calculates the different fastener lengths for the tapered slopes, and applied SF of tapered System values for labor and asphalt/adhesive requirements.
The Tapered drawing report gives an accurate account of board layouts with Filler requirements along with a detail of the cut through of the actual tapered system with corresponding progressive fastener requirements. The estimator can arrive at an exact tapered cost now instead of waiting on the inflated suppliers quote. He can apply the waste that he wants to apply. He can easily value engineer alternate possibilities. He doesn’t have to guess at fastener length quantities.
Tapered Insulation Module Properties Screens:
GENERAL:
Description – A Specific description of what you are estimating in this condition, be as descriptive as possible. Try to be consistent throughout your estimate with abbreviations, etc.
C1, – C6 – User defined fields that allow you to create fields for information that you need, but the program does not include. For Acoustical the C5 and C6l fields have been predefined as Tile Color and Grid Color.
Manufacturer – Select from the Lookup Database the manufacturer and type of insulating board being used.
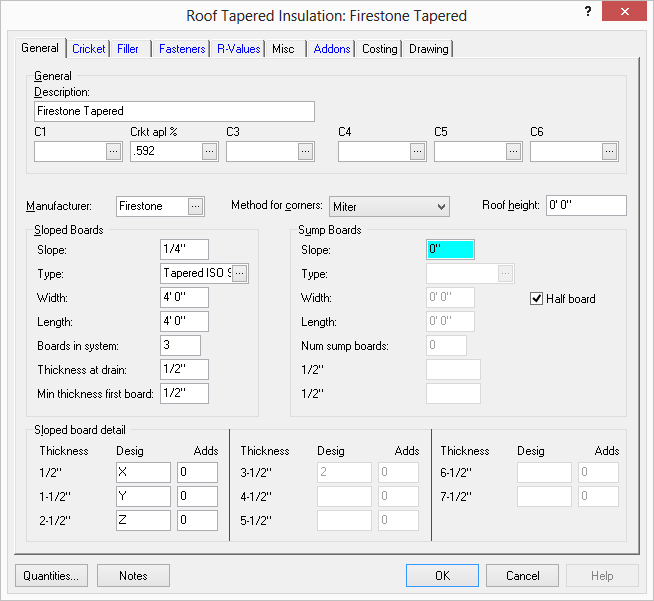
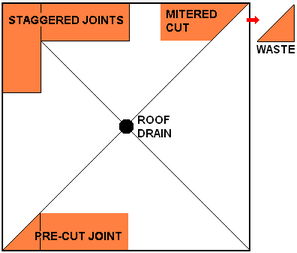
Method For Corners – The Edge has the ability to calculate corners for the sloped and filler boards. There are 3 options for you to choose from; Stagger Joint, Mitered Cut, and Pre-cut. Select from the drop down the corner method you want to use. There are three choices. See Figure 1 below.
Miter – Contractor field cuts the insulation boards on the job site.
Staggered – Corners are kept square the ends are staggered.
Pre-Cut – Boards are purchased with ends pre-cut at 45°
The EDGE has the ability to calculate corners for the sloped and filler boards. The EDGE has 3 options for you to choose from:
·Staggered Joint
·Mitered Cut
·Pre-Cut.
Roof Height – Optional field where the height of the floor above ground level may be entered it does not affect calculations.
SLOPED BOARDS:
Slope – Enter in this field the slope of the tapered insulation boards.
Type – Select from the drop down the type of insulation board you want to use.
Width – Enter in this field the width of the sloped boards. When the width is entered in conjunction with the slope, The EDGE will automatically calculate the thickness of the sloped boards.
Length – Enter in this field the length of the sloped boards.
Boards In System – Enter in this field the number of boards for the sloped system.
Thickness At Drain – Enter in this field the thickness of the board at the drain. This field will also change the attributes of the sump thickness.
Min Thickness First Board – Enter in this field the minimum thickness needed for the first board.
SUMP BOARDS:
Slope – Enter in this field the tapered slope of the sump boards.
Type – Select from the drop down the type of sump board you want to use.
Width – Enter in this field width of the sump boards.
Half Board – This feature allows the sump to be accurately estimated by taking a 4′ X 4′ and creating a 2′ X 4′. Doing so allows the 45° angles to be cut for proper fitting. The remainder of the board is considered waste. This method will use four boards in a 4′ X 4′ system as opposed to 8 boards.
Note:
It is recommended to leave Half Board checked at all times. The EDGE will automatically apply this method depending on board size .
Length – Enter in this field the length of the sump boards.
Number Sump Boards – Enter in this field the number of sump boards needed. Max number of boards is 2.
0″ & 0″ – These two fields display the thickness of the sump at the drain. It is determined by the Thickness at the drain field. This is also where you enter the sump designation.
SLOPE BOARD DETAIL:
Sloped Board Detail – Allows you to enter the tapered board label designation. The number of available boards is determined by the Boards in system field and the thicknesses are automatically determined by a combination of the Slope, the Width, and the Min thickness first board fields.
Thickness – The thickness is determined by the Shape and Width fields of the Sloped Boards. The primary thickness is controlled by the Minimum Thickness First Board field.
Designation – Enter here the sloped board Alpha (Letter) designation.
Adds – Enter the amount of additional boards you would like in addition to what is calculated.
Crickets
Cricket Sloped Boards:
Manufacturer – Select from the Lookup Database the manufacturer of the cricket boards.
Slope – Enter in this field the slope of the tapered crickets
Type – Select from the Lookup database the type of cricket board to be estimated.
Width – Enter in this field the width of the cricket board. When the width is entered in conjunction with the slope, The EDGE will automatically figure the thickness of the cricket boards.
Length – Enter in this field the length of the cricket board.
Boards In System – Enter here the number of boards in the system.
Min Thickness First Board – Enter the minimum thickness of the first cricket board.
Method For Corners – Select from the drop down the corner method you want to use. There are three choices Miter, Staggered, Pre-Cut the same as used for Sloped Boards General tab.
CRICKET SLOPED BOARD DETAIL:
Allows you to enter the tapered board label designation. The number of available boards is determined by the Boards in system field and the thicknesses are automatically determined by a combination of the Slope, the Width, and the Min thickness first board fields.
Thickness – The thickness is determined by the Shape and Width fields of the Cricket Boards. The primary thickness is controlled by the Minimum Thickness First Board field.
Designation – Enter here the sloped board Alpha (Letter) designation
Adds – Enter the amount of additional boards you would like to add in addition to what is calculated.
FILLER
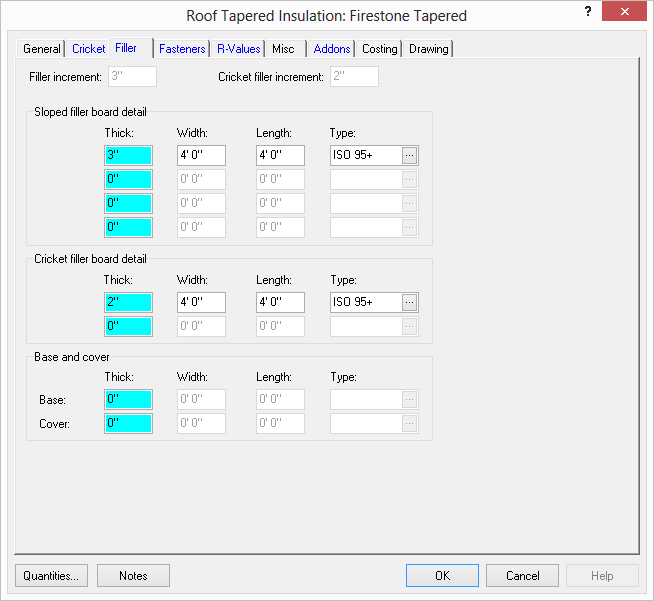
The Filler tab allows you to change the properties of the filler board. The Filler increment and Cricket filler increment are determined by the high point of the last sloped board/cricket boards minus the low point of the first sloped or cricket board.
Filler Increment – This is the recommended filler board thickness. The filler board increment is automatically calculated and cannot be changed.
Cricket Increment – This is the recommended cricket filler board thickness. The filler board increment is automatically calculated and cannot be changed. The cumulative sloped filler board thicknesses should be equal to or a multiple of the Cricket filler increment.
Sloped Filler Board Detail – Allows you to change the attributes of the sloped filler board.
Thickness – Enter the thicknesses of the sloped filler board.
Width – Enter the width of the sloped filler boards.
Length – Enter the length of the sloped filler boards.
Type – Select the type of sloped filler boards to be used.
Cricket Filler Board Detail – Allows you to change the attributes of the cricket filler board.
Thickness – Enter the thicknesses of the cricket filler board.
Width – Enter the width of the cricket filler boards.
Length – Enter the length of the cricket filler boards.
Type – Select the type of cricket filler boards to be used.
Base and Cover – This section gives you the ability to add a base or cover layer.
Thickness – Enter the thicknesses of the base or cover.
Width – Enter the width of the base or cover.
Length – Enter the length of the base or cover.
Type – Select the type of base or cover to be used.
FASTENERS
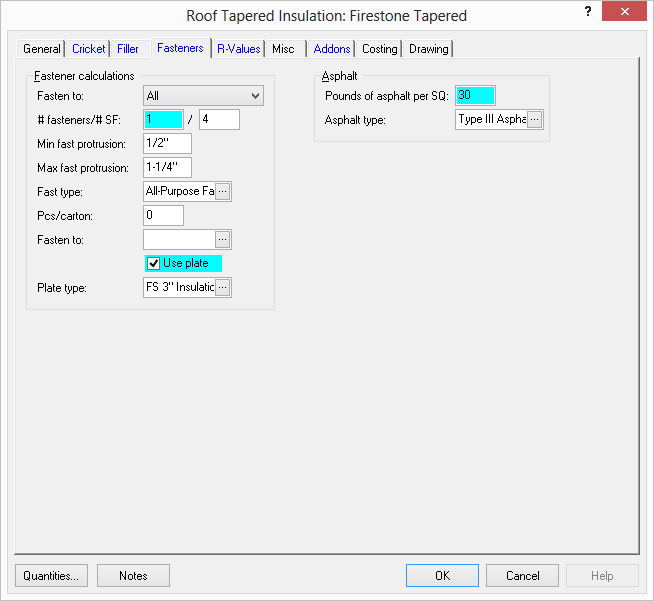
This section gives you the ability to choose and setup Fasteners for the sloped roof
Fastener Calculations – These are the fields where you will set up fasteners for the tapered roof.
Fasten To – Select from the Lookup Database what you will be fastening to.
# Fasteners/ # SF – Enter the quantity of fasteners needed for coverage per square foot
Min Fast Protrusion – The minimum length the fastener will penetrate through the deck.
Max Fast Protrusion – Enter the maximum length the fastener will penetrate through the deck.
Fast Type – Select from the Lookup Database which type of fastener to be used.
Pcs / Carton – Enter the amount of fasteners that come in a carton. If you enter a zero in this field, you will get a piece count of fasteners.
Fasten To – Select the substrate that the fasteners are fastening to.
Use Plate – Check this box if you will be including plates with the fasteners.
Plate Type – Select the type of plate to be used.
Asphalt – This section gives you the ability to use asphalt. Calculations are based on total squares of insulation
Pounds of Asphalt per SQ – Enter in this field the pounds of asphalt required per square of roof.
Asphalt Type – Select from the Lookup Database the type of asphalt to be used.
R – VALUES
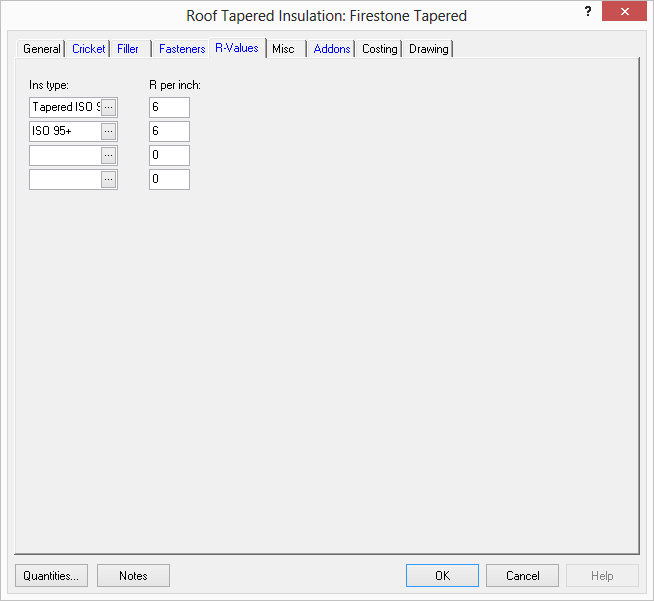
The R-Values tab gives you the ability to keep track of the insulation R-Values as specified in the insulation manufacturer’s specifications
Caution:
This tab does NOT repeat NOT perform R-Value calculations. It is used for informational purposes only.
Insulation Type – Select from the Lookup Database the Insulation Type to be estimated.
R Per Inch – Enter in this field the specified “R” value from the drawings and or specifications.
Miscellaneous
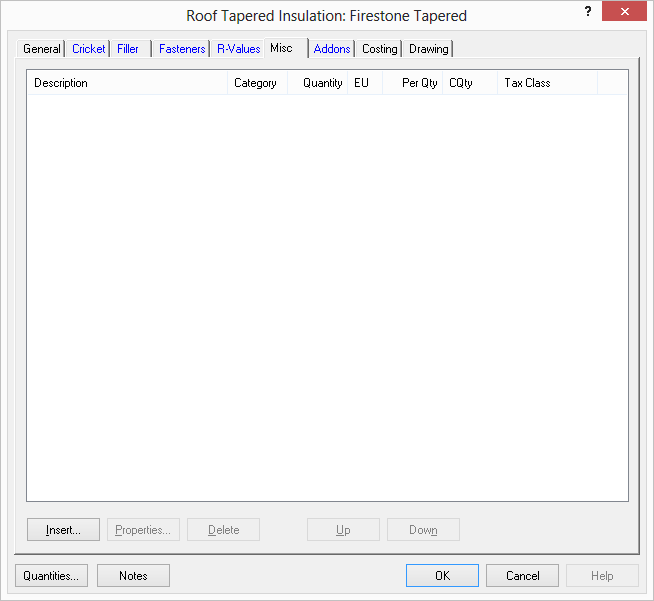
From time to time you may find that you need to add items to a job that are not often used elsewhere. For example, a job may require a special fastener. Under normal circumstances you would have to stop estimating, then have to add then item to the Item Database, insert the item into the estimate and finally, continue estimating. The Miscellaneous screen eliminates having to stop to add this once in a lifetime item. Another case, is where you have items that are used “sometimes” but not “always,” caulking or sealant for example sometimes it is required and at other times it is not. Without a Miscellaneous screen you again would have to add or delete the item, with a Miscellaneous screen you can turn items On and Off with a single click of the mouse.
Due to the volume of material regarding the Miscellaneous and also due to the fact that the information transcends all trade please refer to How to Use Miscellaneous for a detailed explanation of the Miscellaneous dialog box.
ADDONS
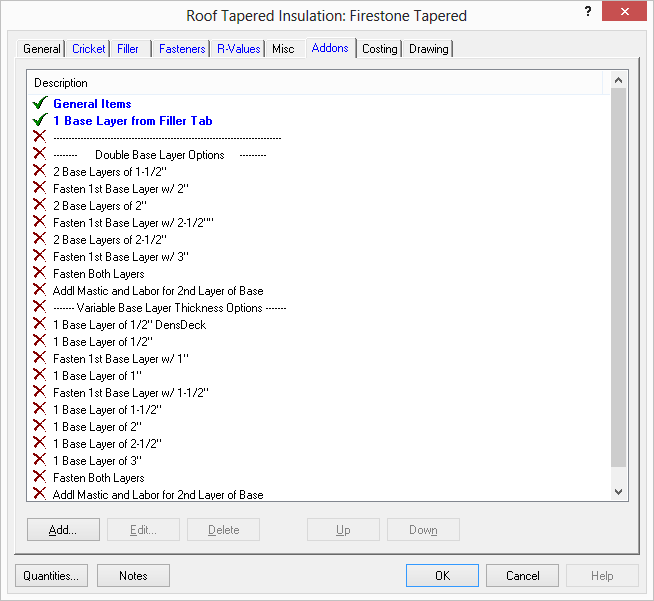
Seen above is a typical EDGE Addons dialog. At first blush it looks very similar to the Miscellaneous dialog, however, in reality it functions more like a group than anything else. What separates it from being a group is the fact that it does not have a condition assigned to it while every group does have a condition. Addons are used to track items such as supervisory labor. A superintendent may be running more than one job and you may want to spread his time and costs over more than one job, you can use an Addon for that purpose. Once the Addon group is set the estimator should never need to touch the Addon Tab on a job to job basis.
Due to the volume of material regarding the Miscellaneous and also due to the fact that the information transcends all trade please refer to How to Use Addons for a detailed explanation of the Miscellaneous dialog box.
Costing
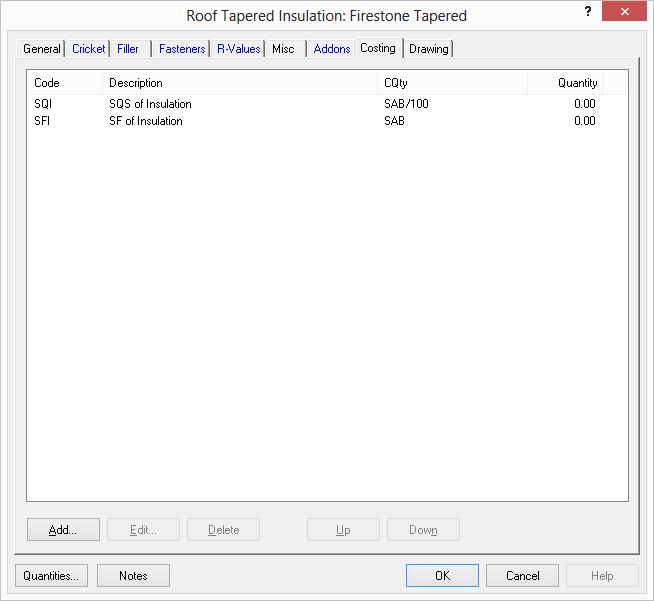
Costing Codes help you accumulate historical costing information. In other words, they accumulate, or add together, quantities of the same units for different items. For example, you may be asked to determine the cost per square foot for an acoustical ceiling. You need a way to convert the total cost of the building into square foot units. Costing Codes provide a way for you to do this.
There are four fields of information displayed in this table: Code, Description, CQty and Quantity. You can Add, Edit, and Delete entries, and you can move them up and down in the list.
Add / Edit – Used to add new Costing Codes or edit existing ones. Clicking either Add / Edit opens the Condition Costing Code Properties dialog.
Condition Costing Code Properties Dialog – Costing Code displays the costing code assigned to the existing line for editing purposes or opens the Costing Code Database where you can either select or add a new Costing Code.
CQty (Condition Quantity) – Displays the current CQty or if need be click icon and open the CQty/Tilde Builder dialog. Please see CQty/Tilde Builder dialog for additional information about CQty’s and Tildes.
Drawing

Drawing Attributes – Where you can override the color, style or size of the lines and counts for the drawing. The program normally automatically assigns so you don’t typically change them.
Color – A drop down list provides you with the different colors available from The EDGE, if you wish to change color click on the color you would like to use.
Fill Style – A drop down list provide you with a list of the different fill styles available for this Condition
Show Add Border – If checked displays “add” borders.
Show Deduct Border – If checked displays “deduct” borders.
Detail
Tape Increment – This function comes into play when you are drawing lines. If you select your tape increment to be 1″, your line will automatically advance forward 1″ as you move your drawing device along. You can select from five pre-set values, or you can select a Custom value (which you will enter into the field next to the Custom radio button).
Detail Scale – If this condition is being used for a detail you can set the scale for the detail here. You can use this field for vaulted ceilings.
Pitch
Override Page Pitch – These fields are used to override any pitch that may have been set when setting up your page. For example, a sloped roof may have 8/12 Pitch but the dormers have a 5/12 Pitch. You would set up the page for the 8/12 pitch. Digitize the overall roof area. Deduct the area the dormers occupy. Insert another area condition, open the condition properties, open the Drawing tab check the Override Page Pitch check box and set the pitch to 5/12. Then Digitize the area of the dormer roof.
Additional Drawing Styles – This dialog offer different choices for the additional drawing styles dialog. For things such as door bucks and corner bead. – For count you can select numerous different count symbols, the size of the symbol in points an finally you will see a sample displayed before closing the dialog, Clicking on Set Drawing Style open the dialog seen to the right. Here you can pick your symbol and font size.
CQtys / TILDES
CQty stands for Condition Quantity – For every condition (wall, ceiling, floor, etc), there are different ways to quantify your labor and material measurements. For example, materials may be sold by the piece or by the pound. Labor may be quantified in terms of how much area a worker can complete in amount of time, he might be paid by the hour, or by the day. So the CQty (Condition Quantity) tells the program how to quantify a particular condition’s measurements.
CQty fields work hand-in-hand with Tilde Codes, first the Tilde refers to this symbol ” ~ ” and can be found on your keyboard just to the left of the number 1 on the top row. Tilde Codes refer a CQty to a specific field on the condition properties dialog, in order to import numbers that are used to calculate measurements.
CQtys and Tilde Codes are two of the most important things for a new user to learn about The EDGE as such they have been given there own section in the Help screens, please refer to CQtys and Tildes