![]() Estimating Edge’s team of experienced construction professionals and software engineers have developed the industry’s smartest takeoff and estimating software solutions for competitive estimates.
Estimating Edge’s team of experienced construction professionals and software engineers have developed the industry’s smartest takeoff and estimating software solutions for competitive estimates.
Don’t just estimate faster. Estimate better.®
- /
- /
- /
Painting Paint Data Dialog
The Painting Paint Data Dialog
Overview:
Painting and wall covering finishes are setup in the Painting Conditions properties window as seen below.
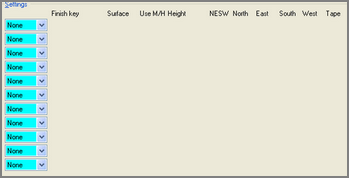
Except for some drop down fields under Settings the screen is empty. The teal colored fields with the drop down arrow contain a list of topics that you will select from to setup the finish specifications for the selected topic. A graphic depiction is shown below of the topics currently available.
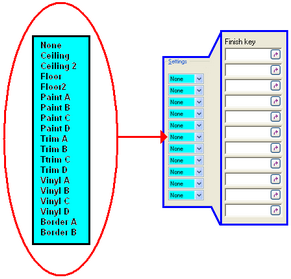
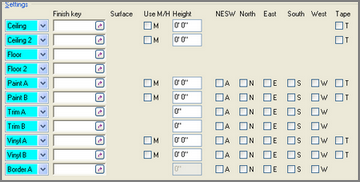
As soon as you select a field a finish key is displayed for that line, in addition depending on what topic you selected other required fields for that line will appear as seen below.
The Finish Key is a special key for the painting contractor. This key allows the estimator to set up a painting condition from the substrate to the finish coat and to save that information so it can be used again in the future.
In the majority of EDGE conditions you will come across ellipsis () keys. The ellipsis key ( ) when clicked on takes you to a Lookup database but the Finish key is different it has a Data Selected icon ( ) it takes you to the Painting Paint Data dialog or the Painting Vinyl Data dialog screen. The Painting Paint Data is seen in the table below.
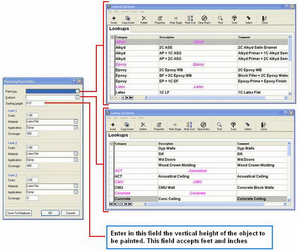
The Painting Paint Data dialog is shown below to the right, this is the dialog screen that opens when you click on any of the Paint Finish Key arrows (). The key can be divided into two distinct areas. The first area consist of the paint key, surface and height. The second consists of Layers 1, 2 and 3.
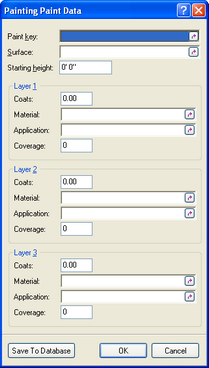
Surface Information
Paint Key – opens the Paint Lookups database, here you will find a list of different type of paint. Highlight a paint and click the Select icon, aka the Blue Bent Arrow ().
That selection will then appear in the Paint key field. See example below.
Surface – opens the Surfaces Lookup database, here you will see different surfaces to select from. Highlight a surface and click the Select icon, aka the Blue Bent Arrow ( ).
That selection will then appear in the Surface field. See example below.
Starting Height – enter in this field the starting height above finished floor for the paint surface. If you are doing a full height (floor to ceiling) wall leave the starting height at 0′ 0″. This field only appears when you are setting up walls, you will not see it for any other application.
Layer (1, 2, 3) Information
The fields for Layers 1, 2 and 3 are identical as such they are written up only once.
Coats – enter here the number of coats per layer you plan to apply to the surface. Typically Layer 1 is used for a primer coat, Layer 2 a base coat and Layer 3 a finish coat. If there was no priming then leave Layer one blank.
Material – opens the Paint Type Lookup database, here you will find a list of different types of paint. Highlight a paint and click the Select icon, aka the Blue Bent Arrow ().
The material will appear in the field, see example below.
Application – opens the Application Method Lookup database, here you will see different application methods to select from. Highlight a surface and click the Select icon, aka the Blue Bent Arrow ( ).
Coverage – enter in this field the expected square foot coverage based on the quantity of the unit (1 Gal pail, 5 Gal Bucket).
Surface Information
Layer (1, 2, 3) Information
-Save to Database – Saves the information created in this dialog to the database for future use and to same you time having to set up the information over and over again.
– OK – Saves the information created in this dialog for the current job but does not save the setup to the database.
– Cancel – Tells the program to cancel whatever you have done, not save anything you have done and close the dialog.