![]() Estimating Edge’s team of experienced construction professionals and software engineers have developed the industry’s smartest takeoff and estimating software solutions for competitive estimates.
Estimating Edge’s team of experienced construction professionals and software engineers have developed the industry’s smartest takeoff and estimating software solutions for competitive estimates.
Don’t just estimate faster. Estimate better.®
- /
- /
- /
- /
Interface Reports – Add (v10)
Interface Reports – Add
Add:
This button is used to add new Interface Reports to The EDGE. Clicking the Add button opens the [Interface] Report Properties dialog window, there are four tabs to this window each is reviewed below.
General tab:
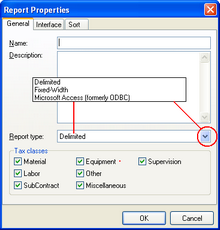
Name – The name selected for the new report. Whatever is type here will appear on the User-Defined list of reports of the Standard Reports menu. This is a required field.
Description – In this box you can enter a more detailed description of the new report, how and why it was created, its purpose and how to use it. This is not a required field.
![]()
Report Type – There are three types of interface reports in The EDGE, you must pick one from the list to build your new report on. The types are:
Delimited – prints information in default mode with text in quotes, numbers without quotes, and commas separating the columns.
Fixed Width – asks you to specify the number of characters of information each column will accept.
Microsoft Access (formerly ODBC) – allows information to be exported to other applications that can access ODBC data.

Tax Class – This field displays all of the tax classes that have been set up in this copy of The EDGE. The first five are standard and the last two on this screen are optional ones created by the user. You must select at least one tax class but you can select as many as you wish. You can use the Tax class to give you specialized reports based on labor only for example.
Interface tab:
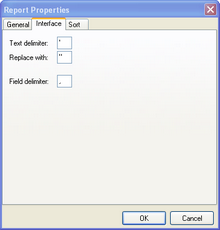
Text Delimiter – A delimiter is a sequence of one or more characters used to specify the boundary between separate, independent regions in plain text or other data stream. An example of a delimiter is the comma character, which acts as a field delimiter in a sequence of comma-separated values. Two of the most common formats for interface files are: Comma Delimited and Fixed Width a Delimiter in data files, is a special character, such as a comma or a quote, or a space, used to separate values or data entries.
![]()
Sort tab:
Used to Sort selected fields from on the Conditions List screen. You may have a very long list of conditions (Drywaller’s, Fireproofer’s, Painter’s), you even have unknowingly doubled up on some walls or beam and by sorting the conditions by name you would notice the error.
To use; click Condition | Sort. The Sort Conditions dialog menu opens

This menu allows you to perform what is called a “four” deep sort, there are four levels as noted by the steps, as you drop down the narrower and more in-depth the sort becomes. In addition there is only a limited amount of fields that one can sort on in a condition to get any relevant information in return. They are: Description field or the C1 through C6 fields.
To set up a Sort just click the drop down arrow and make your selection, then click OK or create another sort level. The Edge will then run the sort. Sorts run in standard numeric, alpha order.
Setup Report:
After clicking OK on the Interface Report Properties dialog a dialog for the report setup will open. Then you will set up the fields of information you would like to import into your report using this dialog. Click on each of the fields you would like to include from the list on the left side of the screen. Press the Add Selected Fields button and they will appear in the Field list on the right side of the screen. When you are finished, click on the Save and Exit () icon and your report will now be listed in the Interface Reports dialog.
