![]() Estimating Edge’s team of experienced construction professionals and software engineers have developed the industry’s smartest takeoff and estimating software solutions for competitive estimates.
Estimating Edge’s team of experienced construction professionals and software engineers have developed the industry’s smartest takeoff and estimating software solutions for competitive estimates.
Don’t just estimate faster. Estimate better.®
- /
- /
- /
- /
Drawing Screen Labels (v10)
How to Use Labels In The Drawing Screen
Labels:
![]()
The Edge will allow you to add labels and notes to your drawings via the Label icon. The following steps will teach you how to add labels to your drawings.
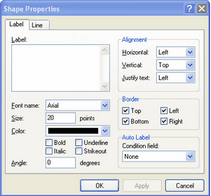
· Click on the Label icon, this will open a dialog screen called Shape Properties.
· In the Label field you will write you note.
· You can set the Alignment of the text using the Alignment field
· You can add borders using the border field.
· You can create Auto Labels by selecting fields from the Auto Label section.
· You can chose the Font, the font size, color, bold. underline. italic strikeout and angle.
NOTE:
You will probably need to use a font size larger than you are used to due to the ratio of screen size to font size
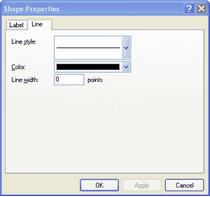
· From the Line Tab of the Shape Properties dialog screen you set the line style, color, line width for the border of the Label your are creating.
· When you are finished creating the Label click OK in the dialog screen.
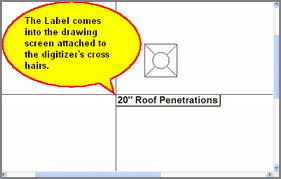
The Label will be hooked to the cross hairs. Just touch the pen to the board. The labels is placed wherever you touch. To turn Label off select any other icon on the drawing screen.
Should you find it necessary to Edit a label do the following:
1.Click on Select.
2.Click on the Label (handle light up).
3.Right click on the Label (menu opens).
4.Click on Properties.
5.Make edits, click OK.
Should you find it necessary to delete a Label do the following:
1.Click on Select.
2.Click on the Label (handles light up).
3.Right click on the Label (menu opens).
4.Click on Cut, Label is removed.